
moglyphfx for After Effects
moglyphfx procedural cloning tool
Download MoglyphFX v2.04 for After Effects on Windows and Mac, a powerful procedural cloning and animation toolset inspired by Cinema 4D’s MoGraph module. Create complex animations by cloning glyph shapes and text within a single layer—no more manual duplication or messy timelines .
Key Features of MoglyphFX v2.04:
- One-Layer Workflow: All clones and animations are handled within a single text layer, keeping your timeline clean and organized while creating complex procedural setups
- Multiple Cloner Types: Six cloner types including Linear, Radial, Grid, Brick, Spline (arranges clones along shape layer paths or onto path points), and Spiral (formerly Fibonacci) cloners for unlimited arrangement possibilities
- Effector System: Apply procedural animations using various effectors that control clone behavior with falloff options based on index or randomization—each with unique effects but sharing common principles
- Glyph Shape Library: Access prebuilt shapes embedded as system fonts through a convenient glyph panel with clickable icons, eliminating the need to manually draw repeated elements
- Time-Saving Automation: Eliminates the tedious process of manually duplicating, positioning, and offsetting dozens of similar graphic shapes—and when changes are requested, you won’t have to redo the entire process
- Complete Control: Full command over cloned shapes, their arrangement, and animation, powered by advanced text animators and expression wizardry
Perfect For:
- Motion graphics artists creating complex repeating patterns and animations
- Designers who need to clone and animate dozens of similar shapes efficiently
- Anyone tired of messy timelines with hundreds of duplicated layers
- Creators seeking Cinema 4D-style procedural workflows inside After Effects
System Requirements:
- Adobe After Effects (version compatibility per documentation)
- Windows 10/11 (64-bit) or macOS
- 4GB RAM minimum (8GB+ recommended)
- 50MB available disk space
- Enable “Allow Scripts to Write Files and Access Network” in Preferences > Scripting & Expressions
Note: Version 2.04 is an earlier release. Version 4.0 is now available with new features including Rings Cloner, Hash (Random Characters) mode, TextStyle Effector, Aim constraint, and MoGlyph-PaintBrush .
Clone and animate Glyph shapes and Text procedurally, just like in Cinema 4D’s Mograph module. You won’t believe what you gonna create within one text layer! NEW: Rings Cloner, Hash (Random Characters)” mode, TextStyle Effector, Aim constraint, MoGlyph-PaintBrush and more!
Introducing MoglyphFX v4, a Mograph like toolset that allows you to clone glyph shapes or texts,
and animate them proceduraly, within one single layer !
How many times a motion designer has to duplicate and animate sequentially a bunch, sometimes dozen, of similar graphic shapes in their projects ?
Of course you could animate your designs with keyframes, then duplicate them, sort them with a time offset… but it is time consuming, and what if you are asked to change the whole animation later ? Well, you’ll have to redo the entire process, again and again, and it would be a nigthmare!
Some existing tools aim at making this process a bit less tedious, but you’ll still end up with a lot of duplicated layers in your timeline, and… Who wouldn’t prefer to keep a well organized timeline, with just a single layer to deal with?
MoglyphFX allows you to create Procedural setups that look and feel a lot like Cloners and Effectors in Cinema4D (or Duplicators and Behaviors in Cavalry), with lot of control over the cloned shapes, their disposition and their animation, all handled by a single text layer (thanks to advanced text animators and expressions wizardry)!

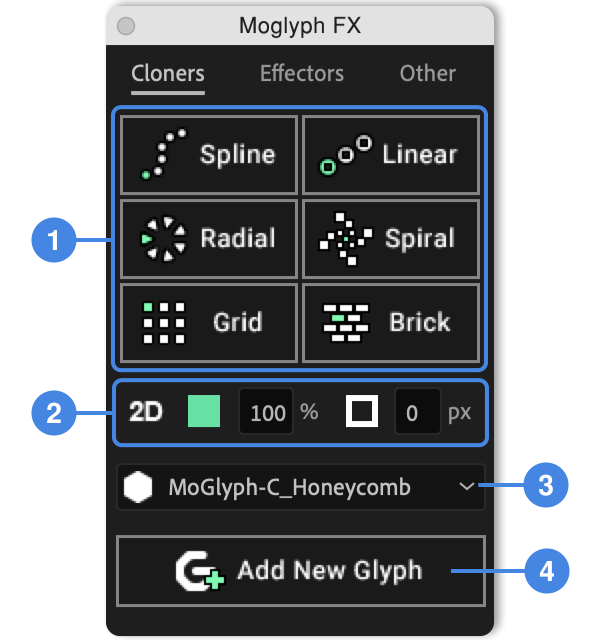
The MoglyphFX panel is divided in 3 tabs:
• The 1rst Tab is called Cloners (it was named Generate in previous versions).
This is where you’ll duplicate and arrange Clones (than can be prebuilt shapes embedded as glyphs in system fonts, or regular human readable text letters/words).
If Clones are Glyph shapes and not regular Text, you’ll be able to add new Glyph Shapes to the Cloner layer thanks to a convenient Glyph Panel (with a grid of 10×10 clickable glyph icons), otherwise you’ll have to double click the MoText layer to edit its sourceText.
• The 2nd Tab is named Effectors (it was called Animate in previous versions).
This is where you’ll be able to create different states for the Clones and to animate them procedurally thanks to the different types of Effectors available. Each of them have a different effect, but they all share the same principles : they have an Effector influence with some specific options, some Parameters and a Falloff that is just a “Text Animator Range Selector” that has been exposed in the effect for more convenience, and that can either be based on index or randomized.
• The 3rd Tab is called Other (formerly named Helpmate).
This last one gives you some useful tools to optimize your Cloners and MoText setups, discover new MoglyphFX stuff thanks to the awesome Demo Projects Library introduced in V4, create new cool effects that are not related to effectors (see Target Glyph and Connect Glyph introduced in V4), create new custom fonts, change settings (new in V3) and retrieve the products and licenses informations.
_____________________________
The Cloners tab

1 Create a new Cloner setup
Click one of the different Cloner buttons to create a new Cloner Layer. There are 6 cloner types:
• The Spline Cloner (arranges clones either along a Shape Layer’s path or on the path’ points, thanks to the new Spline Cloner Points mode introduced in V4, that you can learn to use in this video section). Note that you’ll first have to select a shape layer with a bezier path first in order for it to work.
You’ll be prompted to choose if you want to clone along the path – in this case, just click YES – or onto the path’s points – by clicking NO. Note that you can bypass this step by using shortcuts. Hold down the Shift key and click this button to clone along the path ; while holding down both the Shift and the Alt keys together will distribute the clones onto each path’s points (and/or tangents if you check this options in the Cloner’s effect).
• The Linear Cloner (clones are arranged inline). You’ll be prompted to choose if you want to align the layer on the first left clone (like in Cinema4D) – in this case, just click YES – or on the center one – by clicking NO. Note that you can bypass this step by using shortcuts. Hold down the Shift key and click this button to align it on the first left clone ; while holding down both the Shift and the Alt keys together will align the layer on the center clone.
• The Radial Cloner (clones are duplicated in a circular shape). Since version 4.2, you’ll have 2 different possibilities : choose between distributing the clones along a single circle path (just click YES to select this option when you are prompted to choose) or on multiple concentric rings, like the holes on a shower for example (click NO in this case). See how to use this new Rings Cloner on the dedicated V4.2 tutorial’s section.
Note that you can bypass this step by using shortcuts. Hold down the Shift key and click this button to clone along a single circle path; while holding down both the Shift and the Alt keys together will distribute the clones on concentric circles.
• The Spiral Cloner (formerly named Fibonacci Cloner and introduced in V3), arranges clones along a spiral, with a default angle set to Golden Angle, which mimics the perfect distribution seen in nature with plants phyllotaxis. See it in action in the dedicated V3 tutorial’s section.
• The Grid Cloner (clones are arranged in a grid array, that can also be tapered in order to create triangle like distributions since V4, as demonstrated here) ;
Holding down the Shift key while clicking this button will rotate the whole layer by 90° and cancel this layer’s rotation by setting the Rotation Z property in the Moglyph CLONER’s Effect > Transform to -90°. This option is especially useful if you want – afterwhile – to animate an Effector’s Falloff by line not from top to bottom but from left to right (like a Cinema4D Linear Falloff that would be horizontal). Please keep in mind that everything that has 2 dimensions like Position and Scale parameters will then be inverted (X will stand for Y and vice versa).
• The Brick Cloner (previsously named Honeycomb Cloner and similar to the grid, but with alternate odd and even amounts of clones in the rows).
Holding down the Shift key while clicking this button will rotate the whole layer by 90° and cancel this layer’s rotation by setting the Rotation Z property in the Moglyph CLONER’s Effect > Transform to -90°. This option is especially useful if you want – afterwhile – to animate an Effector’s Falloff by line not from top to bottom but from left to right (like a Cinema4D Linear Falloff that would be horizontal). Please keep in mind that everything that has 2 dimensions like Position and Scale parameters will then be inverted (X will stand for Y and vice versa).
2 Tweak the Cloners’ Options if needed
For any setting that you change in this group, any new Cloner you create will take this setting into consideration, but you can also change them afterwhile (if you have one or multiple Cloner Layer(s) selected). From left to right :
• Toggle 2D/3D (Cloners and text layers have to be set with this 3D option in order to play with Position.Z, Rotation.X and Rotation.Y in the Cloners’ Transform groups and in the Effectors’ Parameters)
• Set the Fill Color for the Clones
• Set the Fill Opacity for the Cloners
• Set the Stroke Color for the Clones
• Set the Stroke Thickness (in pixels) for the Clones
3 Choose a Moglyph font (native or custom), or use a special mode (MoText or Hash)
This dropdown list contains all the thematic Moglyph fonts available (with 100 glyph shapes in each) on your computer, including the ones designed by yourself as Custom fonts, plus 2 last options called “MoText” that will use plain human readable caracters instead of Glyph shapes. See points numbered 5 to 8 in the next section called ” The Fonts dropdown list ” for more details!
4 Add New Glyph shapes to your selected Cloner
By clicking this button while a cloner layer is selected, you’ll open a “Glyph panel“, just like in Illustrator, that allows you to replace the default square glyph shape by another one, that you can then pick among a grid of exactly 10×10 glyphs, and that will be based on the font you had chosen in the Fonts dropdown list 3 above.
A new Glyph Effect will then be added at the top of the Cloner’s Effect stack, with an ID slider that you can change, if you want to change the shape to something else in the grid (you can go hover the glyph shapes in the Glyph panel with your mouse cursor and you’ll see its corresponding ID number shown in a Helptip bubble).
A Cloner isn’t bound to have only one single glyph shape and can have multiple ones ; in this case, shapes are cloned in “iteration” mode by default, but you could also prefer a random distribution of the chosen shapes instead. To do that, just change the “Iterate” mode by the “Random” mode (it’s the first option available in all the Moglyph Cloners effects).
Once you have added all the glyphs shapes you want to your selected Cloner, just close the Glyph panel window (you’ll still be able to add more glyph later, at any moment, by clicking again on the Add New Glyph button).
See how to change the default square shape and add new glyphs in the dedicated section of the Quickstart tutorial.
Since version 4, you can also hold down the Shift key on the keyboard while clicking this “Add New Glyph button“, which allows you to use the useful Glyph panel even if no Cloner layer was selected, in order to populate a new regular text layer (without any Cloner expression) with any chosen Glyph from the 10×10 glyphs grid.
If both the Shift + Alt keys were held down before clicking the “Add New Glyph” button, a checkbox called “Auto-convert to Shape outlines instead of adding to a text layer (not editable afterwhile)” will be automatically ticked-on, meaning that, once a Glyph iconbutton will be clicked in the grid, the Glyph panel will close and the text layer will be converted as a Shape Layer instead (perfect when you just want a single shape from the library in order to use Shape Layer’s possibilities like gradient fills, repeaters, trim path, taper/wave strokes, merge path etc…). See this new shortcuts in action here.
_____________________________
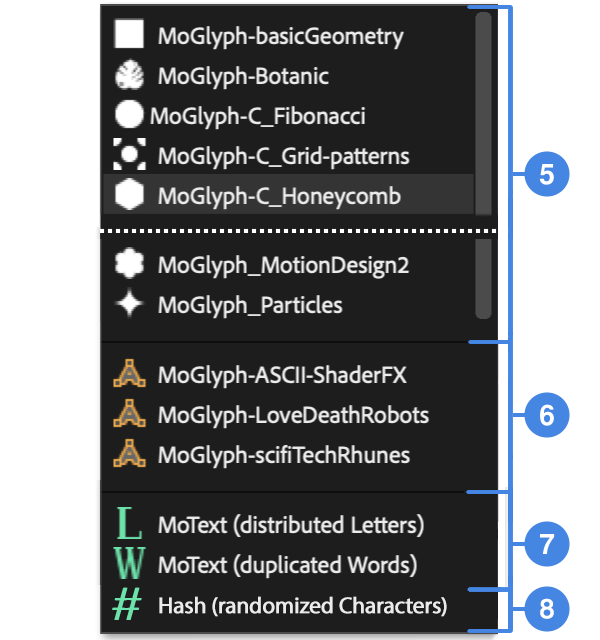
The Fonts dropdown list

Here is what you’ll have in the dropdown list if you click on the button n° 3 (in the Cloners Tab image):
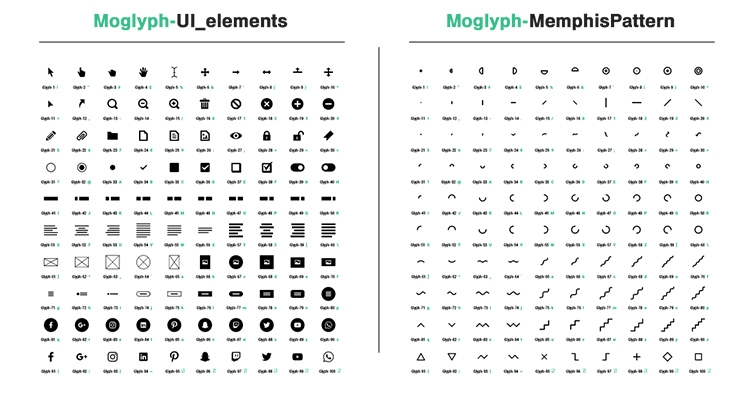
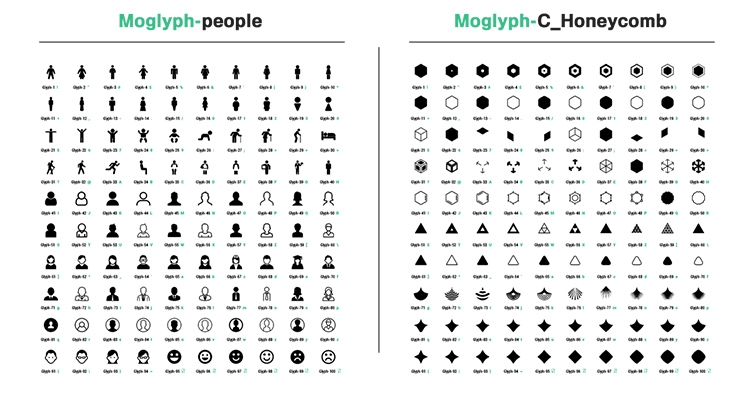
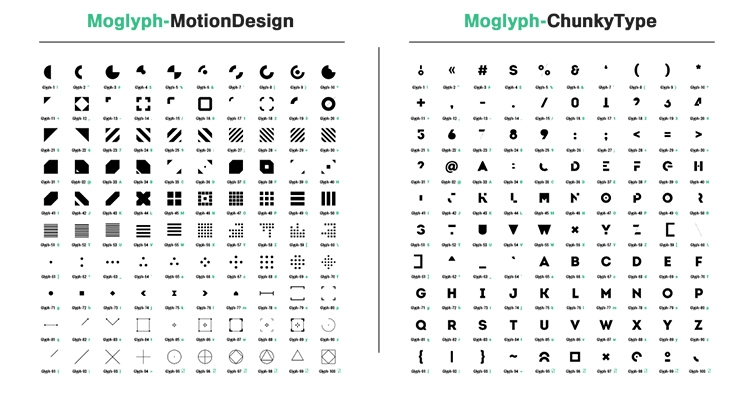
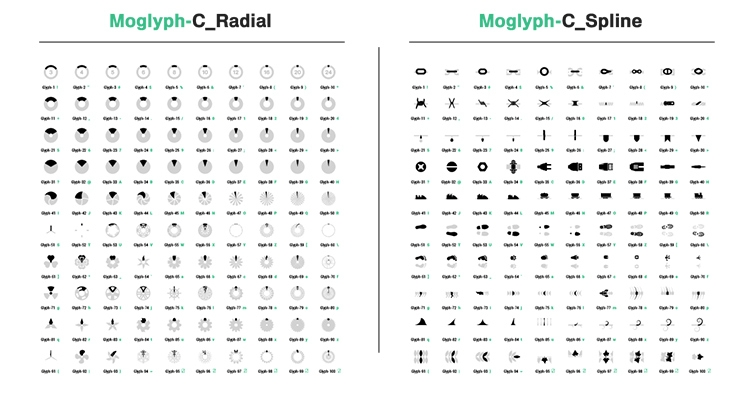
5 Built-in MoGlyph Fonts ( ◼ white icons)
The first part of the dropdown list features all the fonts that have been designed by the creator of MoglyphFX and that are delivered with the toolset. They are identified by a different white icon, each representing what the fond is about (a square for “geometric”, a leaf for “botanic”…), but not necessarily the shape you’ll be cloning by default (the cloned shape will always be the very first Gyph-01 shape available in the font, which is defined by the “!” exclamation mark on the keyboard).
There are already 25 different MoGlyph thematic fonts, covering various usages like Geometric shapes, HUDs, Web UI, Infographics, patterns and even Particles (each of these fonts contains exactly 100 glyphs, meaning that you have a huge library of 2500 shapes to play with, and there will be even more added in future releases!).
You can have a glimpse of all the available glyphs, conveniently sorted by Font in a PDF document with useful infos like the release version or Keyboard key correspondence, by clicking the “Glyphs Appendix” button in the “Other” Tab (see point 15 ).
/!\ Please note that, even if the fonts appear in this list, it doesn’t mean that they are correctly installed ; if you see an exclamation mark (!) in place of the expected glyph shapes once you have selected a font and clicked on a Cloner, it means that the corresponding font hasn’t been correctly install on your system. In this case, please re-install all the fonts (or just the missing one(s)) from the downloaded .zip folder, as explained at the bottom of this page.
6 Custom Fonts ( A orange icons)
If you – or one of your colleagues – has designed a custom MoGlyph font thanks to the Custom Font Creator Assistant feature (located in the Other tab, see point 15 ), these fonts will be listed in this section, separated from the other ones by thin horizontal separators, and with the same orange bezier “A” shape thumbnail icon.
/!\ If you have to update the product in the future and have such custom fonts installed, please do not remove the folder called “MoGlyphCustomAssets” in your After Effects Scrips > ScriptUI Panels folder, because this is where your custom fonts are saved! You’ll also have to copy and paste this whole folder in this same path if you need to update After Effects to newer versions (re-installing or updating MoglyphFX will only replace the other “MoGlyphAssets” folder and the .jsxbin file).
7 MoText modes ( L and W green icons)
These 2 options in the Fonts dropdown list are not some specific fonts, but allow you to use ANY font installed on your system. They have been introduced in version 4 and are really nice new additions, as they allow you to use the 6 Cloners types to either distribute the letters of some editable text (double click on the MoText layer to edit its source) thanks to the first “MoText (distributed Letters)” mode (in this case you won’t be able to play with the Cloners’ Count option, since it will vary based on your edited text ; this is why this Count Parameter has an expression, please don’t remove it!). Or to clone the text you edit as many times as the Cloner’s Count option is defined, thanks to the second and last “MoText (duplicated Words) mode.
In order to fully understand and use both these features, please refer to the corresponding section of the MoglyphFX V4 video overview.
8 Hash (Random characters) mode ( # green icon)
This new mode introduced in version 4.2, allows you to populate any Cloner type by random characters, as defined by a chosen range. To use it, just select this mode in the list first, then click on any of the Cloners buttons to create a new Cloner. It will then come with the usual “Moglyph CLONER” effect, plus a new “Moglyph RandomChar” one, where you’ll be able to choose the Characters Range from a list: “Binary Numbers“, “Digit Numbers” (starting from 0 or 1), “Alphabet” (lower or uppercase) or the “Full Unicode” range, and – of course – to change the random seed if needed. Note that if you choose this mode in the Fonts dropdown list, the “Add New Glyph” button will be greyed out.
See this mode in action in the dedicated section of the MoglyphFX V4.2 tutorial
_____________________________
The Effectors tab

8 Link multiple Effectors together
The Group FX allows you to link the Strength and the Falloff values (From/To, Offset, smooth/easing) of several Effectors (just select them in the Effects panel and click this button in order to create the links).
See it in action in the dedicated chapter of the MoglyphFX v2 overview.
9 Animate the Clones thanks to the awesome Effectors
Just select a Cloner/MoText layer generated by MoglyphFX or a regular text layer, then click on one of the following buttons:
• The Plain Effector applies values uniformly, as defined in the Parameters effect’s group, to all the clones or just a portion of them if you play with its Falloff.
Since version 4.2, if you hold down the Shift key while clicking this button with a regular text layer selected (not a Cloner generated by MoglyphFX), a TextStyle Effector* will be applied instead, allowing you to change the text tracking, faux blod/italic, horizontal/vertical scale and even the Font familly, all based on a Range Start, End and Offset index sliders! See it action here !
*This feature is only compatible with AE CC2025 and later (because it relies on new Text expressions API).
• The Delay Effector, totally revamped in v3, animates the clones Sequentially, Inwards/Outwards or Randomly from their initial state (you can invert its keyframes to reverse the animation) to some specified parameters, with some automatic secondary motion (choose among some awesome Animation Remapping Presets : Elastic, Bounce, Smooth, Flicker, Quantize). Please watch the dedicated part of MoglyphFX v3 video overview to understand its full potential.
• The Formula Effector applies parameters values based on 1 of the 3 different formulas available : Curve animation, N selection or Random direction. This effector as been greatly improved in version 4, with tons of new options, so please have a look at the dedicated section of the MoglyphFX v4 video overview.
• The Random Effector animates your clones randomly, in an organic way, based on the parameters you specify (the Wiggle mode is looping based on the Composition duration). You are not bound to have some animation : just set the Animation speed if you want a still design.
Holding down the Shift key while clicking this button will apply a random still Position instead of the default animated scale/hue ;
Holding both the Shift + Alt keys while clicking it will apply a random still Rotation instead of the default animated scale/hue ;
• The Sound Effector : select your Cloner or Text layer first, then select a layer that has some audio with the SHIFT key, and click on this button : it will animate the Glyphs based on the sound wave of your audio layer ! Refer to the dedicated section of the V2 tutorial for an in depth overview
• The Step Effector : play with the Curve‘s keyframes to reshape your clones, from the first to the last, directly in the AfterEffects Graph editor, just as you would do in Cinema4D’s “Spline graph” !
• The Time Effector creates a perpetual motion onto your clones, based on the values specified in Parameters. No keyframes are needed !
• The Mask Effector has been introduced in V4 and allows you to apply Parameters values to Clones that are detected as being inside or outside of the corresponding Mask path. Please refer to the corresponding chapter of the MoglyphFX V4 video overview for more details on how to use it.
/!\ The Mask FX will also create a second layer called with the same name as the selected Cloner/Text layer, followed by the suffix [Matrix]. It is mandatory for the Mask Effector to work and can’t be deleted ; this is why it is greyed out and locked in the composition!
• The Shader Effector was also introduced in V4, and will animate Clones based on the Luminance (default), Red, Green, Blue or Alpha channel of another layer. In order to use this feature, you’ll have to first select your Cloner/Text layer, then to select the other layer you want as the Luminance source secondly. For more infos about this Effector, please refer to the corresponding section of the MoglyphFX V4 video overview.
/!\ This Shader FX also comes with a second same named layer with a [Matrix] suffix ; this one can’t be removed, otherwise it will break the setup entirely. Also, please keep in mind that this new Shader Effector won’t manage to handle a lot of Clones, because it relies on the “sampleImage()” expression that can dramatically slow down your machine if there is a big amount of clones (so… mind your Count setting!)
10 Set the Effector to be based on Glyphs, Words or Lines
Any new Effector that will be applied to a Cloner/Text layer by clicking the Effectors buttons will have their Effector (=Expression selector) based on Glyphs (=characters in normal human readable text), Words or Lines depending of what you choose in this dropdown list. But you can change them on the fly afterwhile too, by selecting one or more compatible Effector(s) in the Effects panel, and by changing it!
/!\ Please note that some of the Effectors won’t be compatible with this option : so the Plain Effector, the Mask Effector and the Shader Effector should be set to be per Glyph and not be changed to something else.
Also, keep in mind that the Anchor Point Grouping setting in the Text More Options sub-group of properties, will also be changed if you tweak this dropdown list, so it will make clones scale and rotate differently.
11 Tweak Effectors Falloff Options
All Effectors work on the same principle : each of them has its own set of specific options in their first Effector group, then you change Properties Values in the Parameter group, and the last group – called Falloff – allows you to restrict the effect to only a portion of the clones thanks to Completion Start, Completion End and Completion offset sliders. But keep in mind that this Falloff is just a Text Range Selector as you would use with normal Text layers, and that you can further tweak Range Selector settings in the Text Animator’s Advanced sub-group, like the “Based on”, “Shape”, “Smoothness”/”Easing” and the “Randomize order”. Well, the dropdown lists and buttons you’ll find in this Effectors Tab’s group, are just a convenient way to change these settings on the fly, for all the Effectors that are selected in the Effect panel, without having to dive in the Text layer properties and to twirl down a lot of hidden option! So, from left to right, you’ll find :
• the Falloff “Based on” option, which can be set to be per Glyph, per Word or per Line
• the Falloff “Shape” option, which can be set to Square, Ramp Up, Ramp Down, Triangle, Round or Smooth
• the Falloff “Randomize Order” option, which is a toggle button set by default to be OFF (showing an icon with 1 2 3 numbers under an arrow) ; if you click on it to toggle this option to ON, the icon will become a double arrow “shuffle” sign, and the last icon on the right – ressembling a dice with a refresh circular arrow – will then become enabled (otherwise it will be greyed out and disabled)
• the Falloff “Change Random Seed” option, that will be greyed out if the previous icon is OFF(with the 1 2 3 numbers icon) and will be available only if the previous option is ON (showing the double arrow “shuffle” sign). In this case, you can select one or multiple Effectors effects in the Effects panel, and click this button in order to randomize the Random Source(s) on the fly.
_____________________________
The Other tab

12 Open the Demo Projects Library or create a Moglyph Cursor
• The “Demo projects” button from the “Other” tab (introduced in v4, as demonstrated there) will open a new dedicated window with a list of pre-built MoglyphFX setup than can be imported in the current project by clicking the “Import selected project” button. Each setup has been carefully named and comes with some hidden metadata that will allow you to search for a specific project as fast and easily as possible (keywords like “web” or “particles” will filter projects that have been tagged with them for example). Each project has also some useful informations attached to it : a description, a thumbnail, an online example (accessible by clicking the same named button), the cloners and effectors used in the project, as well as the MoglyphFX font used and the minimum After Effects compatibility.
Once imported, the composition will be automatically added to a folder named “Moglyph Assets” in your Project Panel, so everything remains clean and organized ; no messy links with external files nor bad project organization!
There are already more than 50 projects to play with, in a wide variety of styles and for a lot of different usages, all covering different aspects of MoglyphFX, so it’s the perfect place to discover new technics and setups for new comers!
Just like for the MoGlyph fonts list, this library will continue to grow up with each new release of MoglyphFX 🙂
• If you hold down Shift while clicking this button, you will create a new “Moglyph Cursor” in your current comp, that can be just keyframed in the sourcetext property to create Click animations and that is able to change depending to some selected layers ! A real time-saver if you have to animate a fake mouse cursor on UI elements or web/apps components!
See how the “Moglyph Cursor” works in this dedicated section of the MoglyphFX v4 video overview.
13 Optimize your MoglyphFX setups
• The button called “Optimize Param.” will open a window where you’ll find some useful options to optimize the selected Effectors’ Parameters (the Effector(s) have to be selected in the Cloner/Text layer Effects stack in order for the buttons to work).
You can see all the available options and how to use them in the dedicated section of the v2 video overview.
• The button called “Remove Glyph” allows you to remove one or multiple selected “Glyph-N” effects applied to a Cloner layer (you’ll have to first select the “Glyph-1”, “Glyph-2” etc… effects in the layer’s Effect stack, above the “Moglyph CLONER” effect).
/!\ This is mandatory to use this button if you want to get rig of one or multiple Glyph shape(s) in your Cloner setup, because if you try to remove it/them manually from the Effect’s stack, you’ll end up with tons of Expressions Errors (since there are also some Text Animators linked to these effects)!
• The button called “Remove Effect” allows you to remove one or multiple selected “EFFECTOR Xxxxx” effects applied to a Cloner layer (you’ll have to first select the Effectors effect(s) in the layer’s Effect stack, below the “Moglyph CLONER” effect).
/!\ This is mandatory to use this button if you want to get rig of one or multiple Effector(s) in your Cloner setup, because if you try to remove it/them manually from the Effect’s stack, you’ll end up with tons of Expressions Errors (since there are also some Text Animators linked to these effects)!
14 Target/Aim constraints and Connect Glyphs
• Clicking on the “Target/Aim Null” button while a Cloner or Text layer is selected will prompt you to choose if you want to create a “Target” Null layer that will stick to a specific Clone’s position (based on its ID number), or to create a “Aim” Null layer that all the Clones will be looking at (altering their rotation).
Click Yes if you want the first “Target” mode, or No if you prefer the other “Aim” one.
In the first “Target” mode, it will create a new Null layer called “Moglyph Target‘, that will stick to the center of the Glyph you want. To choose the Glyph on which the Null should stick to, just change the ‘Target Glyph ID‘ slider in the ‘Moglyph Target Position‘ effects of the Target Null Layer. There is also a checkbox called ‘Hide Target Glyph‘ there: ticking it OFF will let appear the Glyph that has been targeted, while ticking it ON (by default) will mask it so you can replace this glyph by any other layer as soon as you parent it to the Null and reset its position.
Note that if you select a second layer after having selected a Cloner or text layer and click this “Target Glyph” button, the script will automatically parent this second layer to the created Target Null and reset its position so you don’t have to bother doing it manually (perfect if you want to quickly add an emoji to an animated text for example!)
See the Target Glyph feature in action here !
If you choose the “Aim” mode instead, all the Clones from your selected Cloner will rotate in order to “look at” a new Null layer called “Moglyph Aim“. This null also has an effect, where you’ll be able to decrease the effect strength, invert the direction and change the axis of the constraint. See how to use the Aim constraint here !
Note that you can bypass the confirm window step by using shortcuts. Hold down Shift while clicking this buttin will create the sticking Target Null, while holding both Shift and Alt together will create the Aim constraint instead.
• Clicking on the “Connect Glyphs” button while a Cloner or Text layer is selected will create a new Shape Layer with a path that connects all its glyphs. By default, it will just be a straight line with one segment between each pair of glyphs (each point of the path being at the exact location of each Clone based on its index), which is the fastest to compute.
But you can tick ON the ‘Use Bezier Tangents‘ (or hold down the Shift key while clicking the button) and it will kind of simulate the sagness that gravity has on ropes! In this case, just let the default ‘Tan. Coordinates System‘ on ‘Global’ and the default 180 degrees on both angles below.
You can also change the ‘Tan. Coordinates System‘ mode to ‘Local‘ and play with the In and Out Tangent Angles below to create interesting other effects like inflated/deflated ropes on a radial cloner.
If you hold down both the Shift + Alt keys while clicking this “Connect Glyph” button with a Radial Cloner that only has the default 100px Circle shape (the Glyph n°51 in the MoGlyph_basicGeometry font), the script will also add a rounded offset to the shape layer, creating the illusion of the famous “Convex Hull” effect seen – for example – in Cavalry!
See the Connect Glyphs in action there !
15 Fonts related features
• By clicking the “Custom Font” button, you’ll first have a message window that either welcomes you if this is the first time you create a custom font with MoglyphFX or just reminds you how to follow the steps if you had already done it in the past. Once the message has been closed, you’ll have a big new modal window that explains everthing you have to do, step by step and in an interactive way, to createn download and install your own MoGlyph font.
Just follow the instructions and you’ll be ready to go ; but if you prefer a video tutorial you can watch how to use it in this section of the MoglyphFX v2 video overview.
• The “Glyphs Appendix” button on the right has been added in version and replaces the “Font Request” button that had been introduced in v3 because absolutely nobody had ever used this option to contact me, so it didn’t make sense to keep it. But with the new “Glyph Appendix” button, you can access the PDF document that lists all the Glyphs that are available in the current version of MoglyphFX, conveniently organized per Font on each page, ordered in the same 10×10 grid as in the real “Glyph Panel” UI (except that they are printed black on white so you can print it), and with useful infos like the Release Number and the corresponding key to type on the keyboard for each Glyph. No need to go to the aescripts website anymore 🙂
See it in action there !
16 Apply Post FX
The Post FX panel that had been introduced in MoglyphFX v3 (watch its demo here) has moved from the bottom of the “Cloners” (formerly “Generate“) tab, to the bottom of the “Other” (formerly “Helpmate“) tab. This is why the 5 icons have their color changed from to green to orange ; these icons have also been revamped to occupy less space in the UI. If you click on one of these 5 buttons while a layer is selected in your composition (it doesn’t have to be a layer generated by MoglyphFX so it can be any type layer: shape layer, footage, adjustement layer…). Here are each Post FX button description, from left to right :
• The “Symmetry FX” button (with a butterfly icon) allows you to apply an horizontal mirror effect, that is already centered on your layer (conversely to the native Mirror effect that is almost never set up as you want in the first place). It also add an additionnal effect called “Symmetry FX”, where you can change choose on which axis the Symmetry should be active and where you can also flip the symmetry effect for either horizontal, vertical or both axis.
If you hold down the Shift key on the keyboard while clicking this button, the Symmetry will be applied vertically instead of horizontally ;
If you hold down both the Shift + Alt keys while clickin this button, the Symmetry will be applied both horizontally and vertically
• The “Repetile FX” button is just a shortcut that applies the native Repetile effect, but sets its “Expand Right/Left/Down/Up” sliders to the dimensions of your compositions so that you don’t have to do that manually
• The “Kaleidoscope FX” button just applies the native “CC Kaleida” native effect to the selected layer
• The “Polar Coordinates FX” button just applies the native “Polar coordinates” effect set to “Rect to Polar” in its “Type of conversion“
• The “Metaball FX” button applies one “Fast Box Blur” effect plus one “CC Threshold” effect set to be in Alpha mode, with their values linked to a third effect called “Metaball FX” where you can change the “Blobiness“, number of “Iterations” and “Shrink/Grow” with sliders.
With this technic, you may obtain some aliasing on the edge of your design so it’s always a good habit to add an anti-aliasing effect on top of the whole effect, like FXAA from Plugin Everything, which is free!
_____________________________
MoglyphFX allows you to use these C4D like Cloner setups
(drag your mouse over or tap the image on phones to play the animation)
SPLINE Cloner (Count mode)

LINEAR Cloner

RADIAL Cloner

GRID Cloner

BRICK Cloner (formerly Honeycomb)

SPIRAL Cloner (formerly Fibonacci)

_____________________________
MoglyphFX comes with the following C4D like Effectors:

_____________________________
The MoglyphFX Cloners, Glyph shapes and Effectors
are handled by a single text layer, which allows to:
- Keep the After Effects timeline light and clean (and you can add as many cloner setups as you want in a same comp)
- Extrude the generated glyph shapes in 3D thanks to Element 3D (choose your Moglyph Cloner layer as a custom Text & Mask layer in E3D) or with the native AE Cinema4D / Advanced Renderer
- Customize Cloners and Effectors by tweaking the Text animators properties and expressions (they still are regular AE Text layers and it’s not a plugin)
- Use 3rd party text scripts and presets on top of the cloners (animate clones with cool tools like Animation composer, Text Evo, Type Jazz…)
- Save the setups as reusable presets (drag and drop all the Cloner’s text groups, mask and effects in the preset library to re-use them later)
- Use the thematic Moglyph fonts (containing a huge library of more than 2500 Glyphs shapes!) in Illustrator’s glyph panel (perfect for the design and storyboarding process). And since they are System fonts, feel free to use them in any other software as well (Cavalry, Cinema4D… you name it 🙂

_____________________________
Made with MoglyphFX
Installation (as explained in this video)
- First install all the Moglyph fonts (like you would install any other font on your OS) contained in the folder called Fonts > MoGlyph-OlderFonts and MoGlyph_NewFonts (users who had installed previous versions may only have to install these new ones)
- Allow Scripts To Write Files and Access Network by turning on the corresponding option in your AE Preferences > General tab.
- Either use the aescripts + aeplugins manager app (easiest) or manually copy both the “MoglyphFX.jsxbin” file and the whole “MoglyphAssets” folder, then paste them at the same level inside your Application > After Effects’ current version > Scripts > ScriptUI Panels folder.
- Restart After Effects
- Launch the toolset called “MoglyphFX.jsxbin” from the Window menu, then enter your license code.
- Once AfterEffects has re-opened, dock the panel wherever you want in your AE’s layout and you are ready to go !
- /!\ Please ensure that your Projects use the “Javascript” Engine and not the “Legacy Extendscript” one while using MoglyphFX V4, otherwise it won’t work! To do that, just go to File > Projects Settings (or type the shortcut CMD+ALT+SHIFT+K on your keyboard), go to the “Expressions” Tab, and choose “Javascript” in the Expressions Engine dropdown list.
- /!\ Also, please note that the advanced expression technic called “Fractionnal Time” that is used heavily for the “Mask Effector”, “Shader Effector”, “Connect Glyphs” and “Target Glyph” features, won’t work properly if you use a Composition Frame Rate that is not a whole number like 30 or 25 fps.
So, if you have your comp set to 29.97 or 23.976 fps, those features will not work as expected. In this case, please change the Frame rate of your comp to a whole number instead (30 or 24 respectively in these two cases).
_____________________________
Important Disclaimer :
- Moglyph FX relies entirely on Afters Effects Text layers, which means that you will always be bound to use some one-color glyphs, provided in the different thematic Moglyph Fonts or created by you thanks to awesome Custom Font Creation Assistant introduced in V2 (in the Helpmate tab). This is the main limitation of Moglyph FX and where it really differs from its contender Cloner+Effectors, since this one lets you use any layer (that can be precomposed with animated graphics in it) as clones. And this is mainly why, Moglyph FX costs almost half the price of Cloners+Effectors.
I will do my best to provide as many useful and nice glyph shapes as I can in a continuously growing font library, and the template available lets you create your own glyph fonts, but not being able to clone and animate some layers is definitely something to keep in mind while purchase this product. - Another major difference between both products is how the “Falloff” options for the Effectors affect the clones. In Cloners+Effectors, you’ll find the 2 most used Falloff shapes that Cinema4D (and other procedural modules like Mash for Maya) offers : “Linear” and “Radial”, which allows you to animate your clones just by dragging the Effectors accross them, just like in Cinema4D. Moglyph FX is an entirely different beast while dealing with Effectors falloff ; since the effectors are in fact some complex “text animators”, you’ll never be able to separate their position from the cloner and, then, to animate your clones in this way. Moglyph FX Effectors’ falloff rather consists of a bunch of “completion” sliders (with a “Start”, a “End”, an “Offset”…) than will help you animate your clones one by one, depending of their index order, from the first to the last by default, or row by row if you check the corresponding option in the “Animate” tab. Note that you can randomize these clones indexes with another cool Effector’s option from this tab, if you do not want to animate clones in a sequential way.
- Moglyph FX offers ALL the 5 Cloner types that Cinema 4D has (and even more since C4D doesn’t even offer a “Fibonacci Cloner” !), including the really awesome “Spline cloner” (which I use a lot in real productions) and the “Honeycomb” that appeared for the first time in Cinema 4D R18 versions, while Cloners+Effectors has only the Linear, Radial and Grid types. Note that Cloners+Effectors offers another great feature that mimics the “Fracture” object from C4D (called “Cluster”), that MoglyphFX will never be able to reproduce due to After Effects Text layers limitations.
- Since Moglyph FX is based on presets with all the properties linked to some effects, it is faster (almost in realtime, just by playing with “Count” slider) to generate a large amount of clones in your comp, while Cloners+Effectors is a bit slower on this point because of the way the script duplicates each layer. But keep in mind that both products, whichever it is, will become to slow down your composition’s preview and render, as soon as you try to animate a large amount of clones with the help of effectors. This is totally normal, and this is mainly due to After Effects own limitations. If you feel that you have reached the limits and it slows you down in your workflow, just consider learning and buying a real 3D software like Cinema4D (but even there, large amounts of clones can become very slow !).
- Moglyph FX is based on Text layers, so you’ll benefit from all the arguments already written above (see the paragraph called “The MoglyphFX cloner’s properties, generated glyph shapes and effectors are all handled by a single text layer, which allows you to…”)
MoglyphFX Fonts Glyphs Appendix
Retrieve all the MoglyphFX fonts, listed in this useful PDF document by their release order, and visually choose the glyphs shape(s) you’ll need in your next motion project, thanks to the numbered Glyphs in the 10×10 Grid on each page (like in the “Add New Glyph” window). You can even type most of the glyphs directly with your keyboard, thanks to the character equivalence shown in green under each glyph !


Elevate your motion graphics workflow with premium collection of After Effects plugins. Whether you are a seasoned professional or just starting your VFX journey, powerful tools designed to streamline complex tasks, unlock creative possibilities, and save you hours of rendering time. From stunning glitch effects and seamless transitions to advanced 3D extrusion and text animation tools, each plugin in our library is rigorously tested for compatibility with the latest versions of Adobe after Effects. Enhance your video production value today and download industry-leading plugins that help you create breathtaking visuals without the technical headaches. Browse our full range and find the perfect extension to supercharge your editing suite now.
➡️ ➡️ For more after effects Plugins 😀 😀
➡️ ➡️ System requirements AE
Reviews
There are no reviews yet.