
Pidgeon Tool Bag for Blender
Pidgeon Tool Bag v3.2.0 for Blender – The Ultimate All-in-One Modeling & Workflow Utility Suite
Versions: v3.2.0
File Size: 25 MB
Download Pidgeon Tool Bag v3.2.0 for Blender on Windows and Mac, a comprehensive “Swiss Army Knife” addon designed to accelerate every stage of the 3D modeling pipeline. From hard-surface detailing and boolean operations to UV unwrapping and scene organization, Pidgeon Tool Bag consolidates dozens of essential but scattered tools into a single, intuitive interface. By automating repetitive tasks and providing smart shortcuts for complex operations, it transforms how modelers work, eliminating the need to dig through deep menus or write custom scripts for everyday modeling challenges.
Key Features of Pidgeon Tool Bag v3.2.0:
- Smart Boolean Operations: One-click union, difference, and intersection tools with automatic cleanup. It handles non-manifold geometry gracefully, fixing normals and removing internal faces instantly after the operation.
- Advanced Edge & Bevel Tools: Specialized tools for creating clean, subdivision-ready edge loops. Includes variable width bevels, chamfering, and automatic crease weighting to maintain sharp edges without manual intervention.
- Quick UV Unwrapping & Packing: Intelligent UV algorithms that automatically unwrap selected islands with minimal stretching and pack them efficiently into the UV space, saving hours of manual seam marking and arranging.
- Mesh Cleanup & Repair: A powerful suite of tools to fix common mesh issues, including removing doubles, filling holes, recalculting normals, dissolving loose geometry, and converting ngons to quads/tris.
- Hard-Surface Detailing Kit: Instantly add panel lines, rivets, bolts, and vents to any surface. The tools automatically adapt to curved topology, ensuring details look integrated rather than pasted on.
- Scene Organization Manager: Quickly rename, sort, and group objects by type, material, or collection. Includes batch renaming tools and visibility toggles to keep complex scenes tidy and manageable.
- Customizable Pie Menus: Access your most-used tools via radial pie menus that can be fully customized. Keep your favorite operators right under your mouse cursor to reduce hand movement and speed up workflow.
- Selection Enhancement: Advanced selection tools including “Select Similar by Area,” “Select Boundary Loop,” and “Select N-Gons,” making it easier to isolate specific parts of a complex mesh for editing.
- Modifier Stack Presets: Save and apply common modifier combinations (e.g., “Subdivision + Bevel + Solidify”) with a single click, ensuring consistency across multiple assets in a project.
- Non-Destructive Workflow Support: Most tools operate via modifiers or temporary geometry, allowing you to tweak parameters or revert changes at any time before final application.
Perfect For:
- Hard-Surface Modelers needing rapid tools for boolean cuts, paneling, and edge refinement on mechanical assets.
- Game Artists optimizing meshes, fixing UVs, and cleaning up topology for real-time engines.
- Architectural Visualizers quickly organizing scenes, fixing imported CAD geometry, and adding structural details.
- Generalists & Freelancers who need a broad set of reliable tools to handle diverse modeling tasks without switching addons.
- Beginners looking for guided, one-click solutions to common modeling problems like bad normals or messy UVs.
- Professionals seeking to streamline their pipeline by automating repetitive cleanup and detailing tasks.
System Requirements:
- Blender: 3.6, 4.0, 4.1, 4.2, 4.3, 4.4+ (Latest LTS recommended).
- OS: Windows 10/11 (64-bit) or macOS 10.15+.
- RAM: 8GB minimum (16GB+ recommended for heavy boolean operations on high-poly meshes).
- No external dependencies required.
Installation:
- Download the Pidgeon Tool Bag v3.2.0
.zipfile. - Open Blender and go to Edit > Preferences > Add-ons.
- Click Install…, select the downloaded file, and enable the checkbox next to Mesh: Pidgeon Tool Bag.
- Access via the 3D Viewport Sidebar (N-panel) under the Tools tab, or via the customizable pie menu hotkey.
What’s New in v3.2.0?
- Blender 4.4 Compatibility: Full support for the latest Mesh API changes and modifier stack updates in Blender 4.4.
- Improved Boolean Solver: Rewritten boolean engine reduces errors on complex intersecting geometry, resulting in cleaner topology and fewer shading artifacts.
- New “Auto-Panel” Tool: Added a dedicated tool for generating recessed panel lines with adjustable depth and bevel, specifically optimized for sci-fi and industrial designs.
- Enhanced UV Packager: Improved packing algorithm reduces wasted UV space by 15%, allowing for higher texture resolution on the same atlas size.
- Performance Boost: Optimized selection and cleanup tools run 30% faster on meshes with over 1 million vertices.
- UI Overhaul: Redesigned sidebar panel with collapsible sections and better iconography for faster tool identification.
Note:
Pidgeon Tool Bag v3.2.0 is designed to be the central hub for your modeling workflow. Unlike specialized addons that only do one thing well, Pidgeon Tool Bag provides a broad range of high-quality utilities that cover 80% of daily modeling tasks. Its strength lies in its reliability and speed; the tools are built to handle messy, real-world geometry without crashing or producing broken results. Whether you are cleaning up a scanned asset, detailing a spaceship hull, or organizing a massive architectural scene, Pidgeon Tool Bag provides the practical, no-nonsense tools needed to work efficiently and professionally.


BETA Features:
- Super Frame Interpolator – – – – – – – v0.1.0
Turn a few frames into a hundreds! The Super Frame Interpolator can generate high quality frames from your animations!
Features In Development:
- Super Organized Nodes
Geo-, Shader-, and Compositor-Nodes, they all can quickly get messy. Create a clean workspace with just a few clicks! - Super Real Sound
Bring your animations to life with realistic sound interactions! - Super Easy Analytics
Are you a professional that needs to track time? Do you want to have deep insights into your scene? Get all the Data you need!
Super Image Denoiser!
Denoise your renders with far greater quality and detail preservation than any built in denoiser!
Regular SID or SID-Temporal!
Still frame or animation, SID got you covered!
Chose what type of denoising you would like for your scene.
– SID-Regular is great for still images and animation, clean and detailed renders at way lower samples than the built in denoiser.
– SID-Temporal is outstanding for animations, offering the same quality as SID and more stability between frames!
Quality to match your needs!
Your production render needs to be of the highest quality, and you still want to have a way to get quick previews?
Pick between three different levels of quality. Standard, High and Super.
– Super is ideal for your final renders, the highest quality, no sacrafices!
– High is the go to setting if you want a quick preview of a scene.
– Standard denoises your frames the quickest, perfect for lookdev.
Control what gets denoised!
Every scene is unique, and some use more passes than others. SID gives you the control over what passes need denoising!
Not sure about which passes your scene has and needs? No problem! Let SID detect it in your scene and set the settings for you!
General settings!
SID-Temporal works with multiple frames at a time, so it needs a place to store the rendered and denoised frames.
You can define that in the “Working Directory”. By default it’s in a folder where the blend file is saved!
You might need more control over individual layers of the image. Both SID-Regular and SID-Temporal support Multilayer-EXR.
Save your render as a .exr file containing all the separate passes that SID used! (Temporal Data is not yet used for Multilayer-EXR denoising)
Advanced Settings!
For fast camera movement SID-Temporal renderings some extra pixels around the frame, keeping your frames artifact free!
Temporal Denoising can’t denoise the first and last two frames, frame compensation fills these frames with SID-Denoised frames!
Let’s start rendering!
Rendering the frames with SID-Temporal is only one click away! You get to see the full preview of the render!
Some projects with thousends of frames can quickly overfill your biggest harddrives!
SID offers you the option to have smaller EXR files, increasing compression while keeping the quality!
Need to resume your rendering? Disable Overwrite existing files to continue where you left off!
Technology like magic!
After the frames have been rendered, you can denoise them with SID-Temporal!
Select the format SID-Temporal should output the files as. PNG, JPEG, EXR and TIFF are available. Need more? Let us know!
Super Advanced Camera works seamlessly with SID-Temporal, adding effects after the denoising!
Motion blur is crucial to get realistic looking rendering, and SID-Temporal gives you just that!
You don’t have to rerender your animation to tweak some motion blur settings, as it gets applied during the temporal denoising!
SID-Temporal has that special feature, to ensure the highest quality with minimal artifacts! Temporal Error Detection!
Many temporal denoiser struggle with artifacts like floating pixels, or ripped parts of the frame.
SID-Temporal can detect these unwanted artifacts, and correct them seamlessly on the fly!
Sufficiently advanced technology seems like magic! Let the magic happen and click “Denoise Animation”
Many become one!
We can’t just leave you there with hundreds of frames. That’s why SID can turn your denoised image sequence into a video file!
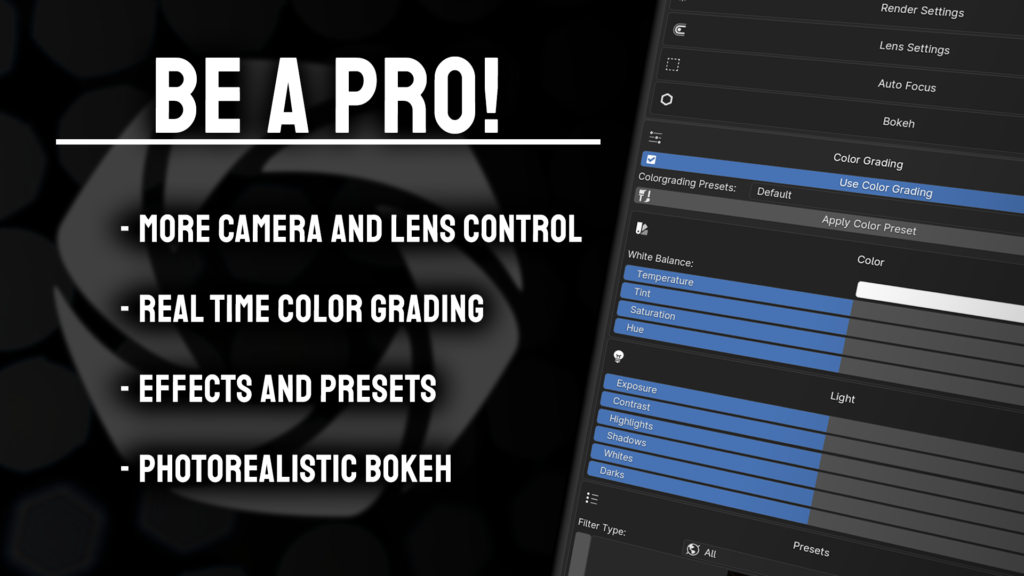
Super Advanced Camera
Quickly edit your images with colorgrading and fancy effects, as well as giving you more control over the camera!
Camera:
Select the camera you want to edit. Easily pick it from a list of cameras in your scene.
Render Settings:
A bunch of commonly used settings, all in one place, with additional info, like time duration!
Resolution:
Change the resolution of your rendered image.
- Width: The width of your image in pixels.
- Height: The height of your image in pixels.
- Scale: The relative scale of your image based on width and height.
Frames:
- Start: The beginning frame of your animation, always 0 or above.
- End: The end frame of your animation.
- Step: How many steps are taken during playback. A value of 2 means every second frame will be shown.
This setting is perfect for preview renders, as you would only render every second frame. - Use Preview Range: A separate frame range outside the regular frame range, that allows you to go past the start and end frames.
Ideal for testing out simulations, as you are not restricted by the render frame range. - Set Start/End Frame: Pressing this button will set your start/end frame to the current frame in your timeline.
- Show Subframes: Allows you to use frames between two frames.
This setting is ideal for high precision animations, or unusual FPS values like in NTSC recordings! - Current Frame: Displays the current frame in your timeline.
- FPS: How many Frames Per Second your animation will be played back at.
- Base: A multiplier for your FPS, useful when working with unusual FPS values like in NTSC recordings.
Time Stretching:
Sometimes you animate your animation at 30 FPS, but would like to render it in 60 FPS, or higher for slow motion shots.
No need to fiddle with the timeline and scaling key frames! You can easily remap the frames with the Time Stretching feature!
The provided presets give you a quick and easy way to get going.
Lens Settings:
Here you have full control over your camera lens
Tilt Shift can be used to give your scenes a miniature look, by shifting the lens and rotating the camera to rotate the focal plane.
Focal Length is like the zoom of your camera, the higher the value, the shallower the image seems.
The Field of View (FOV) is directly correlated to the Focal Length, and is a value you usually see in video games.
Min. and Max. Visible Distance is the distance your camera renders objects at.
This value can be used to remove objects that are too close to the camera, and it allows you to look through walls.
Ideal for interior renders!
Bokeh:
We are especially proud of our bokeh feature. In the chase for realism we collaborated with Prof. Dr. Matt Gunn, who provided us with 84 bokeh images taken by real cameras, for the most photorealistic bokeh possible!
- Focus Object: With this you select the object you want the camera to focus on.
- Focus Distance: Alternatively to the focus object, you can set the point of focus manually.
- F-Stops: Just like on a real camera, you can set the Aperture to control the blurriness of the bokeh.
SAC offers you three options for the bokeh type you might want to use.
Camera is the most realistic bokeh you will get, with 84 bokeh images you have plenty to choose from.
In addition to that, information about the lens the bokeh was captured with is provided.
When realism is not the goal, or you need something simpler, you have the Procedural option:
In need for something extra special, or a custom bokeh you made yourself, using the Custom option, you can easily give your scene your personal flair.
Color Grading
With color grading you can manipulate the looks of your scene to tune it right to your needs.
Color
The color section focuses on the general looks and feels of the colors in your scene.
- White Balance: Adjusts the overall color tone of an image to make it appear more natural, compensating for the color temperature of the light source.
- Temperature: Adjusts the color balance of an image, making it cooler (bluer) or warmer (more orange).
- Tint: Adjusts the green-magenta balance in an image, compensating for color cast from certain light sources.
- Saturation: Increases or decreases the intensity of colors in an image, from vivid to gray.
- Hue: Rotates the hue of all colors in the image around the color wheel
Light
The light section controls the brightness and darkness of your scene without affecting colors.
- Exposure: Adjusts the overall brightness of an image, simulating the amount of light hitting the sensor.
- Contrast: Modifies the difference between the darkest and lightest parts of an image, making shadows deeper and highlights brighter.
- Highlights: Adjusts the brightness of the brightest parts of an image without affecting the darker areas.
- Shadows: Adjusts the brightness of the darkest parts of an image without affecting the brighter areas.
- Whites: Adjusts the luminance level of the very brightest parts of the image, helping to set the white point.
- Darks: Adjusts the luminance level of the very darkest parts of the image, setting the black point.
Presets
The presets give you a collection of filters that give you a quick and easy way to give your scene a special look.
The Filters are the main feature of the presets category, with 58 filters to choose from.
The intensity of each filter can be controlled with the Filter Blend slider. Being disabled by default, and enabled by any value above 0.
Extreme Value Correction is recommended if your image has values far below 0 and far above 1. It clamps your image into a 0 to 1 range.
- Sharpen: Enhances the edge contrast of an image, making details stand out more.
- Vibrance: Increases the intensity of muted colors while avoiding over-saturating already vivid colors.
- Saturation: Increases or decreases the intensity of all colors in an image, from vivid to gray.
- Shadow Tint: Alters the color tint specifically in the shadow regions of an image.
- Highlight Tint: Alters the color tint specifically in the highlight regions of an image.
Curves
The curves are a simple yet very powerful category, giving you two types of curves you can use to manipulate your image:
Colorwheels
The color wheels give you control over the color of certain parts of your image, based on their luminosity
Effects
The effects is another big feature, that provides you with a preset of special effects you can add to your image.
Effect List
With the effect list you can chose from an extensive and ever growing list of effects to apply to your image.
Using the effect picker, you get a preview of the effect.
Adding the effect to the list, provides you with extensive controls of the effect in the Effect Properties panel.
The order of the effects can be changed using the arrows on the right of the effect list.
Multiple effects of the same type are supported, too!
These are the effects that are currently implemented, or in development:
- Bokeh: A photographic effect where the out-of-focus areas of an image are rendered as soft, pleasing blurs, often seen as circular patterns.
- Chromatic Aberration: A distortion where colors misalign at the boundaries of high-contrast areas, often producing a slight red-cyan fringing.
- Duotone: An image effect where only two colors are used, creating contrast between highlights and shadows.
- Emboss: Gives the image a three-dimensional appearance, making it look as if it’s raised or stamped.
- Film Grain: Adds a textured pattern, simulating the grainy effect seen in old film photographs.
- Fish Eye: Creates a spherical distortion in the image, making it look like it was shot with a fisheye lens.
- Fog Glow: Adds a soft, ethereal glow to brighter areas of an image, simulating a mist or fog effect.
- Ghost: Produces translucent, ethereal duplicates of image elements, giving a ghostly or eerie effect.
- Color Gradient: A gradual blend of two or more colors.
- Halftone: Reproduces an image using dots of varying sizes and spacing, reminiscent of newspaper print.
- Infrared: Simulates the look of infrared photography.
- ISO Noise: Adds grain or noise to an image, simulating the visual interference seen at high ISO camera settings.
- Mosaic (Pixelate): Blurs details by transforming them into large, visible pixels.
- Negative: Inverts the colors of the image, producing a look similar to a photographic negative.
- Overlay: Superimposes one image or color layer over another.
- Perspective Shift: Alters the viewpoint or angle of the image, skewing or tilting objects within.
- Posterize: Reduces the number of colors in the image, resulting in a more abstract, flat-colored look.
- Streaks: Adds linear light patterns, often used to simulate the effect of light leaks or lens flare.
- Vignette: Darkens or lightens the corners and edges of the image, drawing attention to the center.
- Warp: Gives the image an effect similar to light speed in Star Wars
- Glitch: Simulates digital or analog errors, producing random patterns and color shifts. (coming soon)
- Oil Paint: Transforms the image to resemble an oil painting with thick, textured brush strokes. (coming soon)
- Pointilism: Recreates the image using small dots or points. (coming soon)
- Sketch: Converts the image to look like it’s hand-drawn, emphasizing outlines and shading. (coming soon)
- Watercolor: Gives an image the appearance of being painted with watercolors. (coming soon)
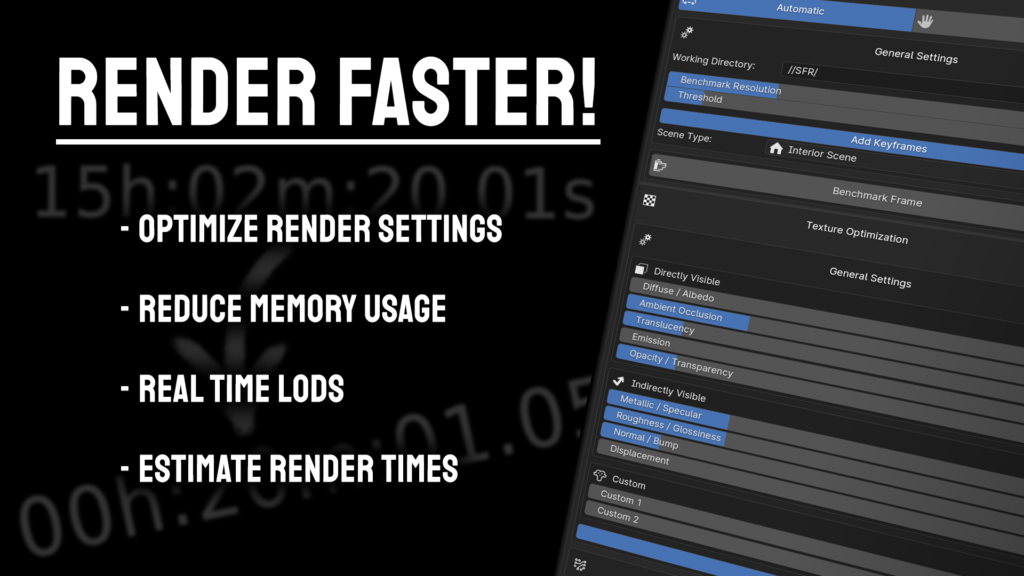
Super Fast Render
Optimizes your scenes for you, so you can focus on the art, and save render time!
Unique scenes need unique settings!
SFR-Automatic benchmarks your scene and detects the best settings for your scene, for fastest rendering at highest quality!
General settings!
While benchmarking, SFR will generate some files, by default, in a sub-folder where the blend file is saved.
The benchmark will render your scene at a smaller resolution, with different settings applied, to detect which settings are the best.
The threshold defines the cut-off point for the quality detection. Values below 0.1 usually make an impercieveable difference!
Animations can be benchmarked too! Define how many frames the benchmark should be appart with the Frame Offset!
Not everything is equal!
Some passes just need more bounces than others. You can define which passes should get benchmarked.
Let there be light!
Light reflecting off surfaces can create a lot of noise, especially if the surfaces is glossy or glassy!
Control which settings get benchmarked, and which will be skipped
Still image or whole animation?
After all the settings have been set, the benchmark can begin!
Benchmark for a single frame, or for the whole animation!
Need more control?
With the help of the presets you can quickly set a predefined quality setting for your scene!
Every setting that SFR changes is listed in the manual category.
What can’t be seen, shan’t be seen!
Reduce the memory consumption of your scene by optimizing the textures in your scene!
Optimize your textures by reducing the resolution of each texture type individually.
Not every texture is seen in the same way, so some can have a lower resolution without any difference in the final render!
Dynamic Level of Detail!
Especially when working with photoscanend assets, unecessary geometry is a big problem, for render time and memory.
The Mesh optimization calculates the polygon density of the mesh, and reduces it to suit your scene.
Giving you similar max polygon density across objects!
Estimation instead of guesswork!
You plan to render an animation and would like to know how long it takes for it to finish? Guess no more!
With the Render Estimator you can estimate how long your render will take, based on benchmarks!
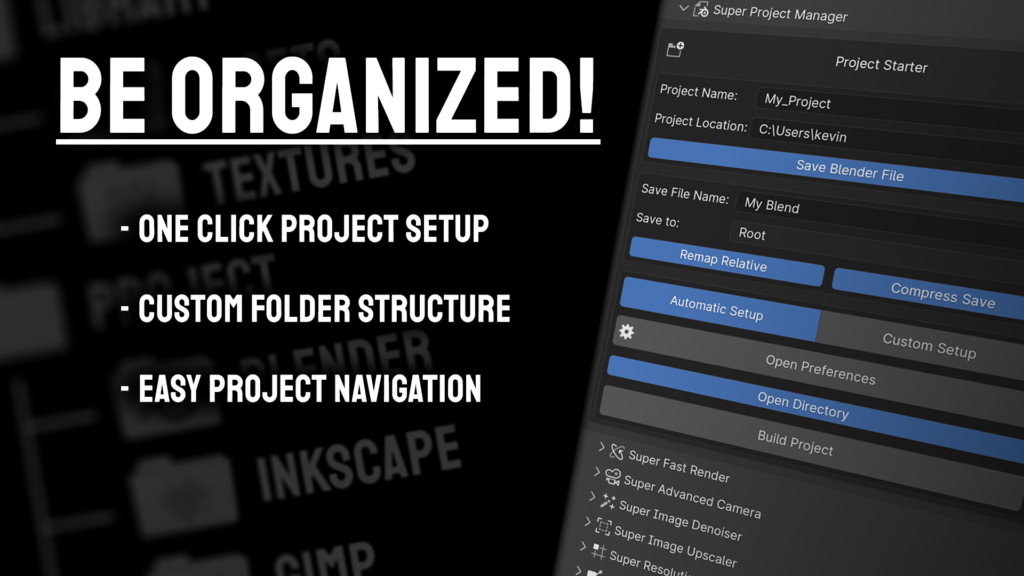
Super Project Manager
Increase your productivity from the ground up!
SPM is designed to be easy to use from the ground up! The automatic setup with the default values will cover most of your needs!
– Project Name: Here you can define the name of your Project
– Project Location: Use the default location set in the addon preferences, or use a custom one!
– Save Blend File: Only create the folder structure, or also save the blend file in it?
– Save File Name: The name of the blend file.
– Save to: Which subfolder the Blendfile will be saved to.
– Remap Relative: Remaps the relative paths to match the new relative paths.
– Compress Save: Compresses the blend file. Tons of geometry will increase the file size, and this will reduce it!
– Open Directory: Opens the Project folder after it was created.
– Build Project: Starts the Project generation!
– Open Preferences: Opens the addon preferences.
– Setup Type: Automatic will use the setup defined in the preferences. Manual offers you a custom folder setup:
Addon Preferences – SPM:
All these options are set across blend files!
– Project Name Prefix: Putting the Project name before the folder name like “Project_Folder”
– Auto Set Render Output Path: Automatically sets the output path to a selected folder
– Folder Structure: Set a custom folder structure, or use the built in default preset.
A preview displays the folder structure Super Project Manager will create for you!
Super Resolution Render
Need to render a huge poster? Super Resolution Render makes it easy as pie!
Select your Rendering method.
– Camera shift: Shifting the camera lens, this is the best method for most use cases!
– Render border: Renders only a part of the full scale image, while leaving the rest transparent!
– Split camera: Splits your camera into multiple smaller cameras, just like Camera shift, but manual!
Select your path to where the partial frames should be rendered to!
Continue where you left using the Start tile value!
Start your render, merge the frames, and enjoy a frame at resolutions blender can’t natively handle!
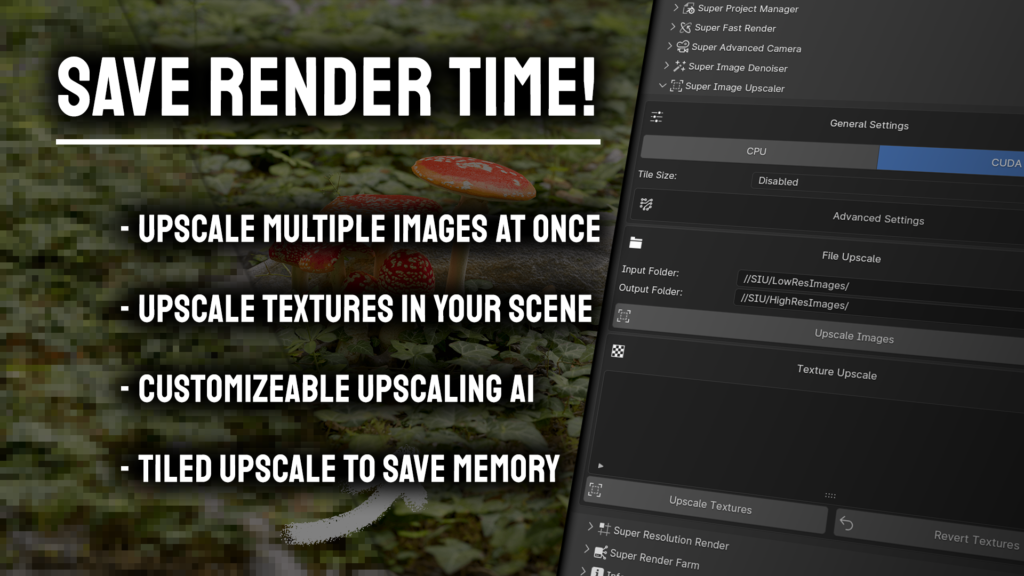
Super Image Upscaler
Increase your render speed with AI Upscaling directly in Blender!
With the help of the peak of AI research, your render speed will increase drastically! Render at a lower resolution, and upscale in post!
Before and After compairson of the AI
Simple user interface – powerful tool!
Keeping it simple and yet powerful, a few settings leading to great results!
– Upscaler Type: Pick between ESRGAN and Stable Diffusion based upscaling.
– Input Folder: The path with the rendered (or non rendered) images that need to be upscaled
– Output Folder: The destination path for all the upscaled images.
– Device: Whether to use CPU or CUDA for upscaling, the quality is the same, but CUDA is significantly faster.
– Output Prefix: The text at the start of the name of the upscaled image.
– Output Suffix: The text at the end of the name of the upscaled image.
– Output Format: JPG, PNG, or TIFF output file format.
– ESRGAN Specifics:
— Primary / Secondary Model: Using two models with different strengths, their combined powers give better results!
— Blend Factor: The bias to which model should be prefered during the upscale.
This feature is only available for the BETA and Priority Support versions!
Super Render Farm – (work in progress)
Easily render across multiple machines using the Super Render Farm!
Utilizing the powerful Pidgeon Render Farm, you can render on multiple machines at once, and control it all within blender!
Set up the main controller of your render farm
Set the settings for your project before rendering!
While Super Render Farm is already functioning, it is still in development and the current release is a preview
Compatibility!
Blender versions PTB is compatible with:
4.0+
PTB might be compatible Alpha, Beta, and Pre-Release versions, but we do not provide official support for these versions, as there are a lot of things that can change in a short amount of time!
Supercharge your 3D creation workflow with premium selection of Blender Add-ons. Whether you are modeling intricate characters, sculpting realistic environments, or animating cinematic sequences, the right add-on can transform how you work inside Blender. Our curated collection includes powerful tools for UV unwrapping, procedural texture generation, rigging automation, rendering optimization, and more—each rigorously tested for compatibility with the latest Blender versions. Eliminate tedious manual processes and unlock advanced functionality that lets you focus on what matters most: bringing your creative vision to life. Explore our full range of professional Blender plugins today and take your 3D projects to the next level.
➡️ ➡️ For more Blender Plugins 😀 😀
Reviews
There are no reviews yet.