
Reaction Diffusion for Blender
Reaction Diffusion for Blender
The Ultimate Geometry Nodes Organic Pattern Generator
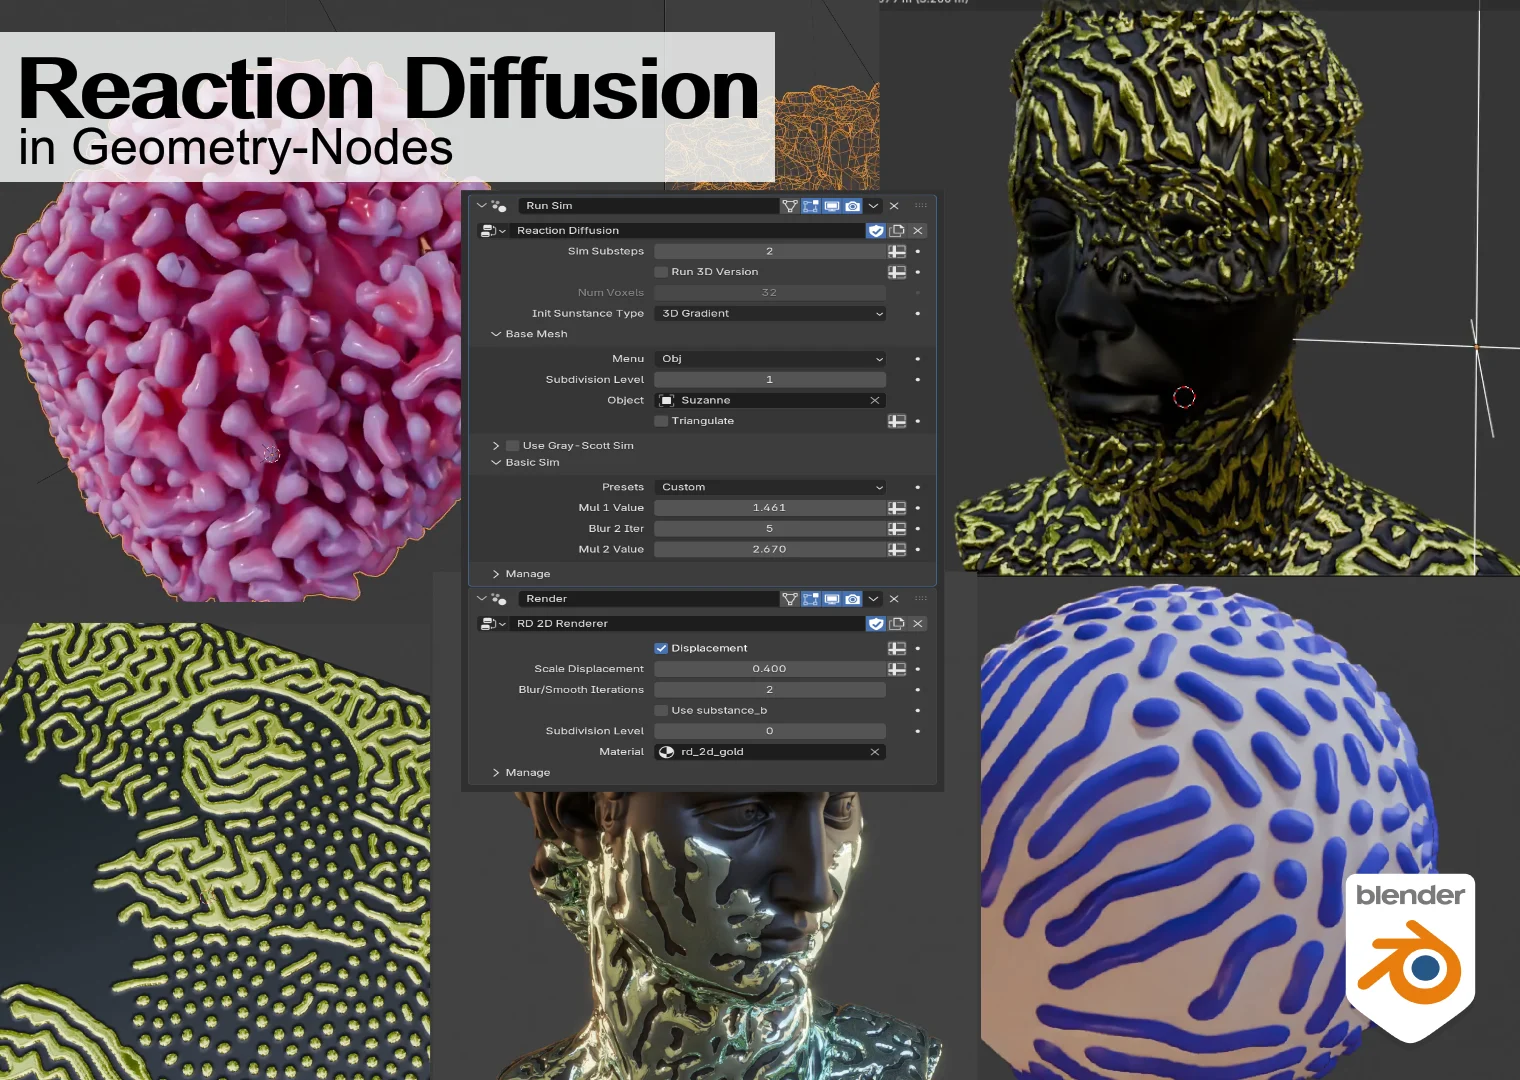
Download the Reaction Diffusion addon today. Consequently, you can simulate complex organic pattern formation directly inside Blender using powerful Geometry Nodes technology. Because natural patterns like animal stripes, bacterial colonies, and biological growth structures are notoriously difficult to create manually, having access to a dedicated simulation tool is absolutely essential. Nevertheless, traditional modeling approaches for these organic forms require painstaking hand-crafting and often fail to capture authentic natural complexity. Fortunately, this addon solves that problem completely. Moreover, it provides a dynamic reaction-diffusion model that generates breathtaking organic patterns through simple parameter adjustments. In short, you can create stunning abstract animations and realistic natural phenomena with minimal effort.
Powerful Simulation Engine with Dual Models
The core of this addon lies in its sophisticated mathematical foundation. For instance, the simulation is built around the reaction-diffusion phenomenon, where two or more virtual substances interact and diffuse across a surface, spontaneously forming complex patterns . Furthermore, the addon includes two distinct simulation implementations to suit different creative needs. The standard Reaction Diffusion simulation operates with a single substance, making it ideal for basic organic pattern generation. Alternatively, the advanced Gray-Scott model simulates the interaction of two distinct substances, producing remarkably diverse and intricate results that closely mimic real biological processes . Since even minor parameter adjustments can dramatically alter the output, you have virtually limitless creative possibilities at your fingertips.
Comprehensive Visualization and Rendering Options
Professional-quality results require flexible rendering capabilities. Therefore, the addon provides both 2D and 3D renderers to suit different project requirements . The 2D renderer enables precise control over plane displacement and shader manipulation, making it perfect for creating detailed surface textures and abstract animations. Meanwhile, the 3D renderer transforms simulation results into volumetric or full 3D mesh outputs, allowing for stunning three-dimensional organic structures . Additionally, the resolution is entirely flexible: higher face counts on your input mesh yield more detailed results, though this naturally requires more computational power . Thus, you maintain complete control over the balance between quality and performance.
Advanced Interactive Tools and Real-Time Feedback
Creative exploration thrives on immediate feedback and dynamic interaction. Consequently, the addon includes a Brush tool that functions as an interactive eraser, allowing you to influence the simulation in real-time as you move and scale it across the surface . This feature enables dynamic, responsive animations where the organic patterns evolve based on your direct input. Moreover, for the Gray-Scott model, a rich library of presets is provided, allowing you to quickly explore different pattern families before fine-tuning parameters to achieve your unique vision . Thus, your workflow remains fluid, intuitive, and deeply engaging.
Perfect for VFX Artists and Motion Designers
This addon is particularly well-suited for visual effects artists creating abstract transitions, organic growth sequences, or natural phenomena simulations. Similarly, motion designers will appreciate the ability to generate dynamic, evolving backgrounds and textures that capture the viewer’s attention. Additionally, anyone working with procedural textures, natural pattern generation, or biological simulation will find the tool invaluable. Ultimately, Reaction Diffusion unlocks a new dimension of creative expression in your Blender projects.
System Requirements and Compatibility
The addon requires Blender 3.6 or newer for basic functionality, though Blender 4.3 or above is recommended for the latest features . Furthermore, it is built entirely on Geometry Nodes and Simulation Nodes, ensuring seamless integration with Blender’s native workflow. It works across all major operating systems including Windows, macOS, and Linux. You will need a standard workstation with at least 8GB of RAM, though more complex 3D simulations and higher resolutions may benefit from additional memory and a capable GPU.
Installation and Usage Guide
To begin, download the zip file from your library. Next, open Blender and navigate to Edit Preferences. Then, select Add-ons and click Install. After that, locate and select the downloaded zip file, then enable the Reaction Diffusion addon . Finally, append the reaction_diffusion_obj from the provided file, which contains two essential modifiers: Reaction Diffusion Main for running the base simulation and Render for visualizing the results. Adjust the exposed parameters or dive into the node tree for full control, and begin exploring the infinite organic patterns . Thus, your professional organic pattern generator will be ready instantly.
What is Included Inside?
The pack contains the complete Reaction Diffusion setup with both simulation implementations. Furthermore, it includes the 2D and 3D renderers, the interactive Brush tool, and a selection of Gray-Scott model presets . Additionally, you receive sample input meshes and conditioning examples to help you get started quickly . Ultimately, you receive everything needed for professional organic pattern generation.
Final Thoughts on the Addon
Effortless organic pattern generation evokes profound creative freedom. Therefore, this addon provides the ultimate foundation for procedural art and natural phenomena simulation. You can create stunning, evolving patterns with unprecedented ease. Consequently, your organic pattern vision becomes a stunning reality.
The simulation includes two core implementations: a “Basic Sim” and the “Gray-Scott Sim”. The first is a general simplistic implementation of the RD model, relying on a single substance and basic image processing logic. The second implements the Gray-Scott model, where two different substances interact with each other (see theory here). Both implementation have their own modifier panel with input parameters and presents. The “custom preset” allows to specify the parameters manually, while other presents provide already tested combinations that give interesting results.
Additionally to the simulation type, a simulation can be run either on the surface of a mesh (default setup) or as a 3D version (via the Run 3D version toggle. The base mesh can be selected via the Base Mesh panel, which allows to select some default meshes or specify your custom object. The 3D version relies on “Volume Grids”, so conversion are made between original mesh and final results. The Num Voxels param controls the resolution of the grid used for the 3D simulation.
While the Run Sim will return the raw results of the simulation, we also provide some utilities to visualise and render the results. RD 2D Renderer gives the control to use the sim results for plane displacement and shader control. RD 3D Renderer allows instead to render results as volume or full 3D mesh, use this option if you are running the 3D version of the simulation.
The sim resolution depends on the resolution of the target mesh or volume. A higher face or voxel count gives more details but requires more computation.
Sim Parameters
For the Reaction Diffusion node-tree, we exposed the most relevant parameters to play with, but you can simply edit manually the values of the core simulation group (e.g. reaction_diffusion_sim) to explore the full range of results.
Sim Substeps controls how many steps are run in a frame. The higher, and the faster the simulation will run, while requiring more time to be computed.
For reaction_diffusion_sim we suggest the following ranges:
Mul 1 Value: from 1.1 to 1.9Blur 2 Iter: from 2 to 10. Higher values allows for faster diffusion, but require more computationMul 2 Value: from 2.9 to 3.4
Results vary drastically with even minor parameter adjustments (e.g. +/-0.01). Many configurations may not produce compelling results, so experimentation through trial and error is essential. Play on low-resolution during such tests, to allow for faster iterations
A big factor of RD sim is the substance(s) initialization. While we provide a basic menu for it, much more control and freedom can be achieved by manually modifying the nodes and values inside the node-tree.
You can also control the substance initialization and parameters via texture, images, weight-paint and attributes by editing directly the content of the Reaction Diffusion node-tree. In the premium version we provide a variety of ready examples that you can tweak and connect as needed.
Brush
You can also find a brush object that can be animated or moved in real time to influence the substances of the simulation. Currently, it act as an eraser. When close enough to a point it will zero-out the substances. You can scale it in real-time to affect the area of influence.
Extra content for Premium version
In the premium version you will find the Gray-Scott model implementation and additional functionalities like simulation presets, option to run and render a 3D version of the simulation, texture/image/weight conditioning examples, plus a richer set of materials.
Gray-Scott Model
The Gray-Scott model is a more complex and rich implementation of the reaction-diffusion phenomena, (see theory here). We provide multiple presets for this implementation. You can select them from the Gray-Scott Preset menu.
When using this model, we suggest to tick the Use substance_b option in the Render modifier. Notice this formulation can also evolve more slowly compared to the basic one, so more substeps (>4) might be required to see interesting results.
3D
To run the RD sim in 3-dimensions, you simply need to enable the Run 3D version toggle, and use the RD 3D Renderer. The only dedicated parameter is Num Voxels, which controls the resolution of the volume grid used. Notice that 3D sim is much more computationally expensive, and can be quite slow to run high-resolution sim, depending on the used hardware. You can always bake a simulation via the “Bake” node right before the “Group Output” in the main sim node-tree.
You can then render results as volume or full 3D mesh (where we use the “Volume to Mesh” utility). Tweaking of the associated materials might be necessary depending on the visual results you want to obtain.
The “3D Gradient” init substance type is a good flexible option to start playing with the 3D formulation.
Input mesh and Conditioning
You can run the 2D version on an arbitrary mesh by selecting the Obj option from the Mesh Menu input and passing your target object. Remember that the resolution of the sim depends on the resolution of the target mesh.
You can also test some of the conditioning examples present in the Reaction Diffusion node-tree by selecting from the various menus, or by manually connecting to the preferred input socket. Tweaking of the range of values is fundamental when trying on different input parameters. This is different from the substance initialization, as the conditioning affects the main sim parameters all along the run.
Technical Considerations
Laplacian Approximation
The diffusion process relies on the Laplacian operator, which can be obtained via custom convolution kernels. Here we simply used the Blur Attribute node and approximate the Laplacian in a dedicated node-tree (laplacian_closures). 2D and 3D versions differ only by the multiplier factor (that account for number of neighbors).
The basic sim uses an even stronger approximation (simple_sim_closures), taking the difference between two scaled blur runs of the original value. That’s where the “mul1, blur2 and mul2” params of the sim come from. There is likely a formulation that aligns these different approaches, but for now we prefer to keep them separate as they both provide interesting results and approaches.
Mesh Topology and Blur
For the 2D sim, given that we rely on attributes at point level, the mesh topology will strongly influence simulation results. Think for example how differently the Blur Attribute node works when applied on triangular VS quadrilateral faces. We provide a “triangulate” option for some of the template input meshes, that increases the number of neighbors of a point from 4 to 8.
3D Sim
To run the simulation in 3D we leverage “Volume Grid” and defined equivalent operations from the 2D run in terms of grid operators. While such equivalence is quite solid, the 3D setup poses even harder requirements on parameters config for interesting results. We will keep working on exploring such area, and welcome feedback, suggestions or discoveries of any kind.
Bundles
We made heavy use of “Bundles” and “Closures” to allow for a more modular setup, that allows to have single node-groups for all the possible sim variations (i.e. basic-sim VS Gray-Scott, 2D vs 3D). This might make the overall node-tree a bit harder to read it first, but it is much cleaner to use and modify.
Changelog
v2
- use Blender 5.0 “Volume Grids” for 3D version, remove all old hacky ways to obtain 3D sim
- use closures for better modularity of sim utils (e.g. between 3D/2D, basic/gray-scott)
- use bundles to pass multiple params in a cleaner way (for example for greay-scott presets). Had to remove geometry from bundles cause it breaks the caching in the node-tree, and gets recomputed every time
- expose more parameters through node-tree, to allow better transparent control
- replace pow with b*b
- more presents for both sim, use bundles to store and propagate them
- refactored and improved renderers, with more control and error messages
Supercharge your 3D creation workflow with premium selection of Blender Add-ons. Whether you are modeling intricate characters, sculpting realistic environments, or animating cinematic sequences, the right add-on can transform how you work inside Blender. Our curated collection includes powerful tools for UV unwrapping, procedural texture generation, rigging automation, rendering optimization, and more—each rigorously tested for compatibility with the latest Blender versions. Eliminate tedious manual processes and unlock advanced functionality that lets you focus on what matters most: bringing your creative vision to life. Explore our full range of professional Blender plugins today and take your 3D projects to the next level.
➡️ ➡️ For more Blender Plugins 😀 😀
Reviews
There are no reviews yet.