
Twixtor Pro v7.3.1 Plugin For After Effect
Twixtor Pro v7.3.1 Plugin for Video Slowdown Scene in After Effects
This section includes the Twixtor Pro plugin version 7.3.1 for After Effects software up to CC version 2020, which is available for download on the site. With the help of this plugin, you can perform the video slowing down scene operation in After Effects professionally.
- Twixtor tracks 360 footage and retimes properly taking into account the connectedness of the edges of the sides as well as the top and bottom
- Contains an option to add or remove motion motion blur, as appropriate
- Option to automatically enhance dark imagery or imagery with poorly defined edges
- Ability to remap audio and video using AE’s time remapping tools but using Twixtor ‘under the hood’
- Smart processing of interlaced material
Twixtor® intelligently slows down and speeds up your image sequences.
Twixtor raises the bar in motion estimation. Twixtor is much more accurate, tracks objects farther, and exhibits fewer artifacts when there are objects crossing in the scene. This means less tearing and stretching of objects as they cross or go out of the frame.
Twixtor enables you to speed up, slow down or frame rate convert1 your image sequences with visually stunning results. In order to achieve its unparalleled image quality, Twixtor synthesizes unique new frames by warping and interpolating frames of the original sequence… employing RE:Vision’s proprietary tracking technology that calculates motion for each individual pixel.
1 Frame rate conversion supported within After Effects, Final Cut Pro, Vegas Pro, Premiere Pro and Avid Media Composer, Symphony and Newscutter. Frame rate conversions can often be accomplished in other applications by writing out image sequences and reading them back in with a different frame rate setting.
Features
- Warping and interpolation of frames to “time warp” input footage.
- Option to automatically enhance dark imagery or imagery with poorly defined edges. In many cases, footage that was difficult to track becomes much more well-behaved upon retiming.
- Contains an option to add or remove motion motion blur, as appropriate.
If you’re looking to create slow-motion footage, the Twixtor plug-in is a go-to tool known for its impressive results and is considered a must-have for slowing down video footage.
While most video editing software offers effects to create slow motion, Twixtor sets itself apart by making the process easy and seamless. In this article, we’ll explore how to use Twixtor in After Effects and also cover how to troubleshoot common issues that might arise while using it.
Let’s dive in!
What is the Twixtor Plug-in?
First, let’s talk about the plug-in. Twixtor is a video effects plug-in for retiming and speed changes like fast and slow motion and frame rate conversion. It’s available for Adobe Premiere Pro, After Effects, DaVinci Resolve, Final Cut Pro, HitFilm, VEGAS Pro, and more.
Hollywood productions often use a higher frame rate to shoot scenes that will have a slow-motion effect. It allows the post-production team to retime the footage and create those stunning slow-motion scenes. It’s easy this way because there are enough frames to extend the footage, but an ordinary video with a standard frame rate will certainly be missing frames.
Twixtor analyzes the video footage on a frame-by-frame basis to estimate the movement from the frame before and after to create frames in between. When other post-production software tries to do this, you usually get a video with many artifacts, warps, and frame blending.
Among the best features of Twixtor you can find:
- Motion estimation.
- Frame by frame keyframing.
- Frame rate conversion.
- Retime 360 videos.
- Enhance dark imagery.
- Object separation (Twixtor Pro).
- User-defined track points (Twixtor Pro).
- Motion vector import and export (Twixtor Pro).
How to Use Twixtor in After Effects
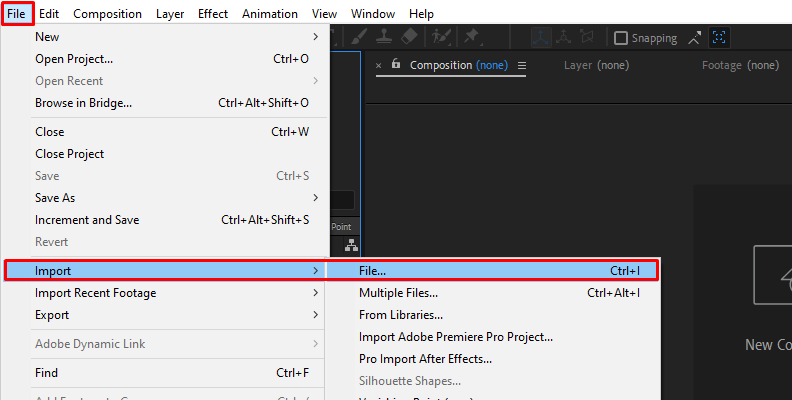
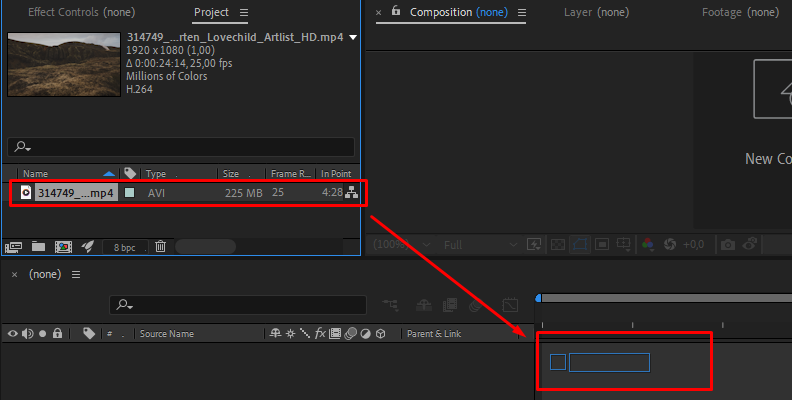
- Step 1: Import Video FootageLaunch Adobe After Effects and create or open an existing project. Go to File > Import > File and browse the video clip on your computer. Then, drag the video clip to the new composition icon to create a new composition and add the video clip to the timeline.
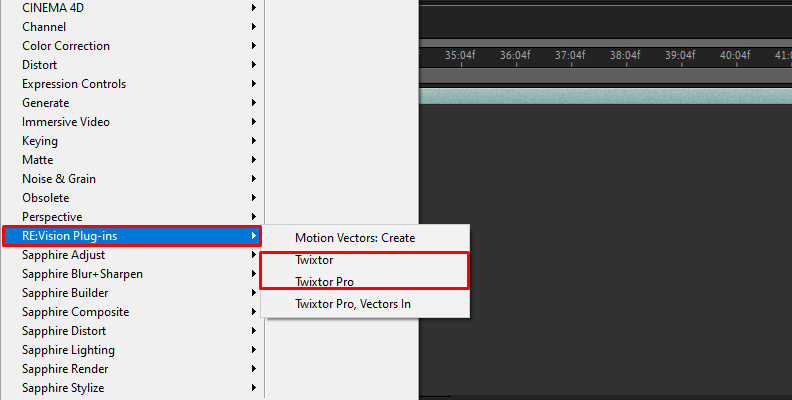
- Step 2: Apply Twixtor Plug-in to your CompositionTo add Twixtor to your video clip, go to the menu Effect and search for RE:Vision Plugins > Twixtor/Twixtor Pro. Ensure you have the video clip layer selected to enable the Effect menu.
- Step 3: Twixtor Initial SettingsTwixtor default settings are usually good enough. However, let’s review the ones you should pay attention to. Go over the Effect Controls panel and display Twixtor settings. The Display setting should be set as ‘Twixtored Output.’
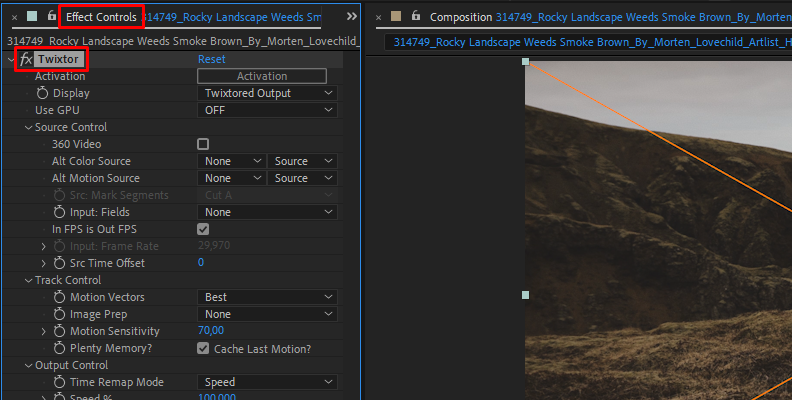 Ensure the option ‘In FPS is Out FPS’ is checked to use the same frame rate as the source video clip. If you don’t have that option with the check box, you must type it manually.
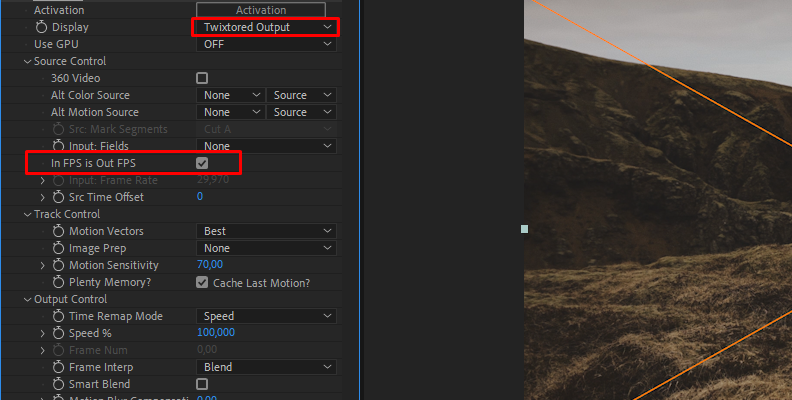 To find the original FPS, go to Composition > Composition Settings. Around the middle of the dialog box, you will find the composition’s frame rate. Type this value in the ‘Input: Frame Rate.’Select Time Remap Mode as Speed. If you have Twixtor Pro, you will see additional settings here you can explore.
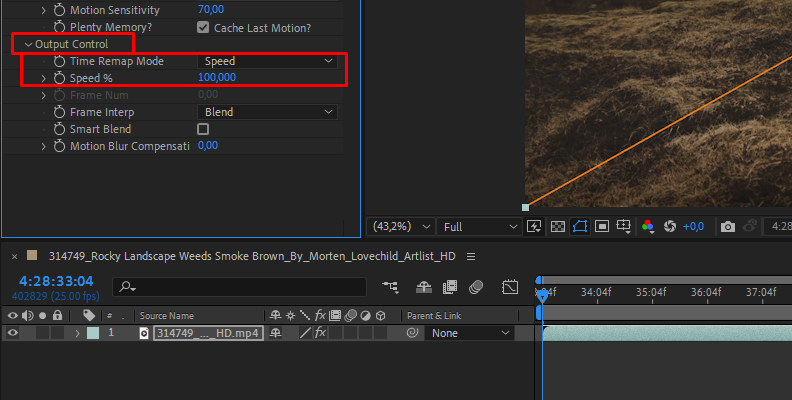
 - Step 4: Create a Fast or Slow Motion EffectStart by deciding how slow you want your scene to be, depending on the mood you want to create. Adjust the speed using the ‘Speed %’ setting under Output Control. By default, it is at 100%, meaning its original speed. Based on that, you can set the speed to 50% to slow the video to half the original speed or increase it to speed up the video.
- Step 5: Animate the Twixtor EffectYou can keyframe the Speed values if you want to use different speeds across your video. Place the playhead on the first frame, set the speed to 100%, and click the clock watch next to Speed % to create a keyframe.Then, move the playhead to a point where you want to make it slower or faster and change the speed value. You can add multiple keyframes to make the effects of slowing down and then speed it up.
- Step 6: Tips for Fixing IssuesDepending on your settings, the video clip, and the speed changes you make, some common issues can occur during the process. Here’s a list of the most common ones and possible solutions.
- Change Composition’s DurationWhen you speed up your footage, you will notice that Twixtor will retain the last frame for the rest of the original duration of the clip. The plug-in cannot change the clip’s duration, so if your original video is 10 seconds and you speed it up by 200%, your new clip will be 5 seconds, but the last frame will repeat for five more seconds. To fix this, go to Composition > Composition Settings and change the duration of your composition to match the speed-up footage.
- Reduce Unwanted Warps and Frame BlendingIf your footage has warps, adjust the Motion Sensitivity to limit how many pixels can move. You can decrease it to help reduce warping or increase it to fix frame blending. If you present both unwanted warps and frame blending, you can keyframe the values in Motion Sensitivity to address both issues.
- Using Track Points (Twixtor Pro only)Track points are available only with Twixtor Pro. Using track points, you can tell Twixtor to look at specific areas to create a smoother image, reducing artifacts and other issues.Display the Track Points parameter, click the ‘Pt 1: Use’ dropdown menu, and select the layer you want to use (usually your main background). Next, click the target icon from ‘Pt 1: Pos’ and place it on the object you want to focus on. You can add up to 12 points this way.You must keyframe each tracking point to ensure it follows the object correctly. Click the stopwatch from ‘Pt 1: Use’ and ‘Pt 1: Pos’, and move frame by frame to adjust each track point following the movement. This method is time-consuming but will provide better results with reduced artifacts.
After effects templates
Amazing clips to use and help you create your own unique projects from AE templates or to improve the design of your existing broadcasts.
We have a wide range of templates for you to choose from. You can find PowerPoint Video Templates, Motion Graphics Templates, and After Effects Logo Templates, Scripts, Promos, news, fashion, sports, social media, titles…
After Effects Templates, Wedding Templates as well, After Effects Intro Templates, Transitions, Products Promos, Instagram stories, Scripts, Call Titles, Elements 3D, Corporate , and many more.
With After Effects project files, or templates, your work with motion graphics and visual effects will get a lot easier. In short, they are customizable After Effect files, neatly organized and labelled. You can easily change colors, text and other design elements without having to spend time on creating timelines and effects. It’s all there-you just need to customize it to fit your project.
What you waiting for? Hurry up and download the best after effects templates
➡️ ➡️ For more Ready Project Files Templates 😀 😀
➡️ ➡️ For more after effects plugins 😀 😀
Reviews
There are no reviews yet.