
Voxel Heat Diffuse Skinning for Blender
Voxel Heat Diffuse Skinning v3.5.3 for Blender – The Ultimate Automatic Weight Painting & Rigging Solution
Version : V3.5.3
File Size: 14 MB
Download Voxel Heat Diffuse Skinning v3.5.3 for Blender on Windows and Mac, a revolutionary rigging utility designed to completely eliminate the most dreaded and time-consuming task in character creation: manual weight painting. While Blender’s native “Automatic Weights” often fails when limbs touch the torso or cross over each other, Voxel Heat Diffuse Skinning uses advanced voxelization and heat diffusion algorithms to calculate incredibly accurate, artifact-free vertex weights in seconds. It ensures your characters deform perfectly, saving you hours of frustrating cleanup and allowing you to focus on animation.
Key Features of Voxel Heat Diffuse Skinning v3.5.3:
- Voxel-Based Heat Diffusion: Instead of relying on simple raycasting, the addon converts your mesh and bones into a 3D voxel grid. It then simulates “heat” radiating from the bones through the voxels, resulting in mathematically precise and organic weight distribution.
- Zero Vertex Bleeding (Overlap Handling): The ultimate game-changer. Because it calculates weights based on volumetric space rather than line-of-sight, an arm resting against a hip will never incorrectly pull the hip’s vertices with it. Perfect for complex poses, tight clothing, and crossed limbs.
- Lightning-Fast Calculation: What used to take hours of manual brushing is now calculated in seconds. The optimized multi-threaded backend processes high-poly character meshes with thousands of vertices almost instantly.
- Perfect Symmetry & Mirroring: Automatically calculates weights for one half of the character and perfectly mirrors them to the other side, ensuring flawless symmetrical deformation and cutting your workload in half.
- Custom Bone Envelopes & Groups: Define specific regions of influence. Tell the addon exactly which bones should affect the torso, the limbs, or the fingers, preventing unwanted influence from distant bones.
- Clean & Paintable Vertex Groups: The resulting weights are smooth, continuous, and free of the “striping” or “noise” common in native auto-weighting. The generated vertex groups are perfectly clean and ready for minor manual touch-ups if needed.
- Multi-Mesh Support: Skin multiple separate objects (like a character’s body, clothing, hair, and accessories) to the same armature simultaneously, ensuring they all move together perfectly.
- Non-Destructive Workflow: The addon generates standard Blender Vertex Groups. You can easily tweak, smooth, or manually paint over the results using Blender’s native Weight Paint tools without breaking the rig.
- Finger & Toe Detail Control: Specialized settings to ensure that small, dense geometry like fingers and toes receive accurate, independent bone weights without collapsing into a single point.
- Game Engine Ready: Clean, normalized weight data that exports flawlessly via FBX/glTF to Unity, Unreal Engine, and Godot without deformation errors.
Perfect For:
- Character Riggers who need to deliver production-ready, perfectly weighted rigs to animators without spending days on manual weight painting.
- Indie Game Developers & Solo Artists who need to automate the skinning process to meet tight deadlines and production schedules.
- Character Artists who want to test their sculpt’s deformations quickly before committing to final topology.
- Technical Artists establishing standardized, reliable auto-skinning pipelines for studios.
- Beginners who are overwhelmed by Blender’s native Weight Paint mode and want a reliable, automated starting point.
System Requirements:
- Blender: 3.6, 4.0, 4.1, 4.2, 4.3, 4.4+ (Latest LTS recommended).
- OS: Windows 10/11 (64-bit) or macOS 10.15+.
- RAM: 8GB minimum (16GB+ recommended for high-poly meshes with millions of vertices).
- CPU: Multi-core processor recommended for faster voxelization and heat diffusion calculations.
Installation:
- Download the Voxel Heat Diffuse Skinning v3.5.3
.zipfile. - Open Blender and go to Edit > Preferences > Add-ons.
- Click Install…, select the downloaded file, and enable the checkbox next to Rigging: Voxel Heat Diffuse Skinning.
- Access via the 3D Viewport Sidebar (N-panel) under the Voxel Skin tab, or the Object Context Menu (Right-Click) > Voxel Heat Diffuse Skinning.
What’s New in v3.5.3?
- Blender 4.4 Full Compatibility: Updated all mesh evaluation and armature APIs to ensure 100% stability, correct UI scaling, and flawless integration with the newest Blender 4.4 release.
- Multi-Threading Optimization: Rewritten the core voxelization engine to utilize all available CPU cores, reducing calculation times for ultra-high-poly meshes (500k+ vertices) by up to 60%.
- New “Island Isolation” Tool: Added a feature to automatically detect and calculate weights for disconnected mesh islands (like separate pieces of clothing or armor) independently, preventing weight bleeding between unconnected parts.
- Improved Non-Manifold Handling: Enhanced the algorithm to better process and clean up meshes with non-manifold geometry or internal faces before voxelization, resulting in fewer calculation errors.
- UI & Workflow Polish: Redesigned the N-panel with a clearer, step-by-step workflow guide, making it easier for beginners to understand the bone grouping and envelope settings.
- Bug Fix: Resolved a rare issue where weights on extremely sharp, acute angles (like the tip of a nose or ear) would occasionally calculate as zero.
Note:
Voxel Heat Diffuse Skinning v3.5.3 is the ultimate cure for the “native auto-weight” frustration. Every rigger knows the pain of using Blender’s “With Automatic Weights” only to find that the character’s elbow is pulling the ribcage, or the hands are deforming the hips. This addon completely solves that problem by treating the mesh and bones as physical volumes rather than simple surfaces. By simulating heat diffusion, it naturally understands the spatial relationship between overlapping limbs, resulting in weights that look like they were painted by a master artist. Whether you are rigging a hyper-realistic human, a stylized cartoon character, or a complex creature with overlapping armor, Voxel Heat Diffuse Skinning gives you a perfect, animation-ready foundation in seconds.
The add-on can help you to resolve three skinning problems:
- Blender throws a message: ‘bone heat weighting: failed to find solution for one or more bones’.
- Some body parts or accessories are ignored, you have to fix vertex weights manually.
- You have spent a long time to fix vertex weights, but you are still not satisfied with the result.
Features
- Built-in ‘Joint Alignment Tool’ add-on.
- Built-in ‘Surface Heat Diffuse Skinning’ add-on.
- Built-in ‘Corrective Smooth Baker’ add-on.
- Physically based energy attenuation algorithm.
- Complete skinning solution.
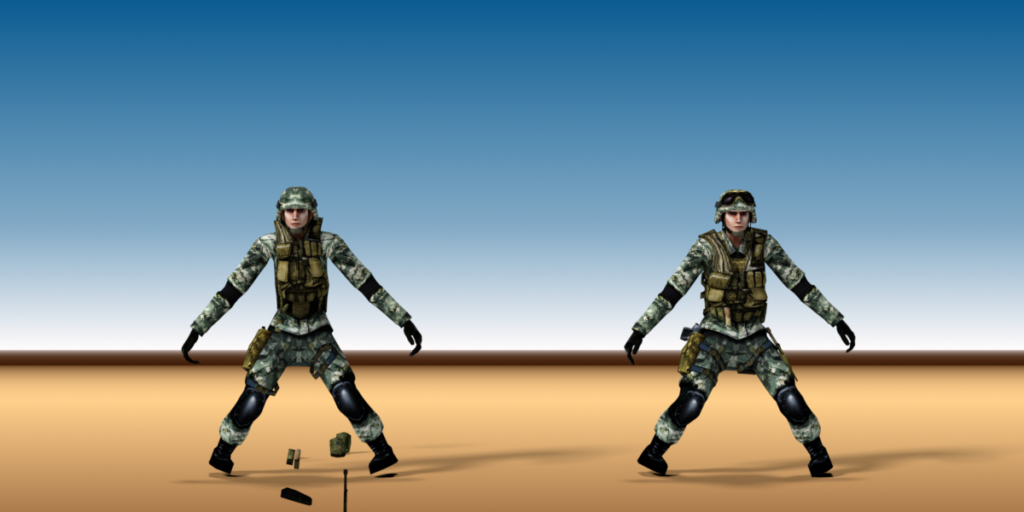
Quick Start

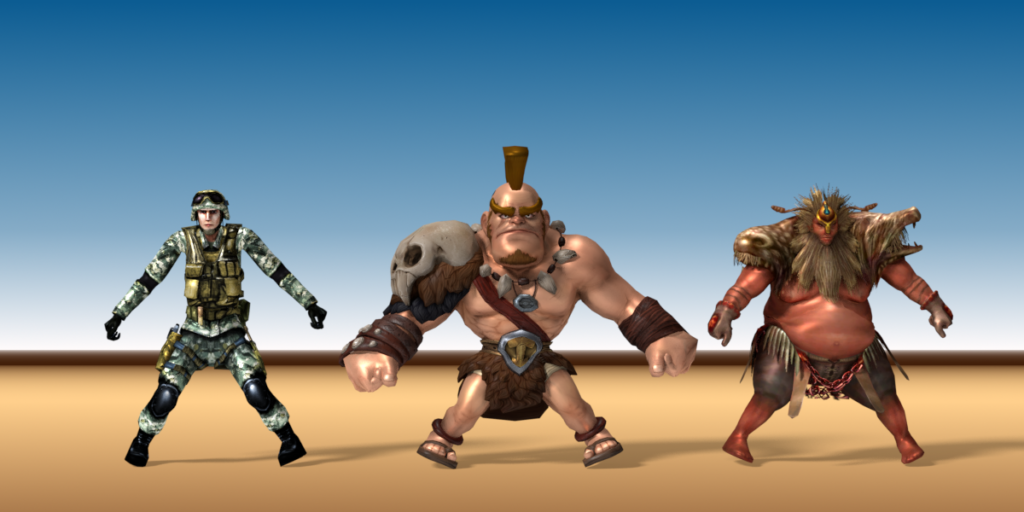
The soldier has a lot of equipments, even if you are a skilled artist, it will take a long time to skin the character.
You can use this add-on to generate perfect vertex weights for the soldier in less than five minutes.
What the artists say:
“Outstanding! You saved me a ton of work!”
“I think you may have saved my life with this add on. Of all the add ons I’ve bought, for what I’m doing and how it’s helping me, this is NUMBER ONE! thanks!”
You may find more comments in the ‘Ratings’ page.
Full Tutorial:
Video Package: Download the HD version of the video(Format:zip,Size:15MB,Date:Jun 17,2021).
Watch Online:
The Story
Two months ago(2017), I needed another 3d character for our educational product, so I quickly generated a character within ‘MakeHuman’, when I tried to bind the character to the armature in Blender, the result frustrated me – The hair broke into pieces, the eyes were drifting in the sky, and there were holes in the body.
If the character is watertight, Blender’s built-in automatic armature deform will work very well, but artists work in their own way, they create various character components, then group them together, this is artists’ most natural workflow.
I used to subscribe Maya LT from Stream platform several years ago, Maya LT has an amazing feature – ‘Geodesic Voxel Binding’, it can deal with non-watertight character, why not add the feature to Blender?
My goal is to achieve better result and better skinning solution, not a simple copy from May LT.
When the product was born, I was so proud of the add-on, it uses unique ray tracing technology to build voxel grid, which is super robust and accurate, and the add-on combines Blender’s built-in heat map diffuse skinning tool and the voxel heat diffuse skinning tool to deal with all skinning issues, I can always get perfect results.
It’s a milestone, Blender has the world’s best armature deform portfolio today.
That’s the story of this add-on.
Introduction
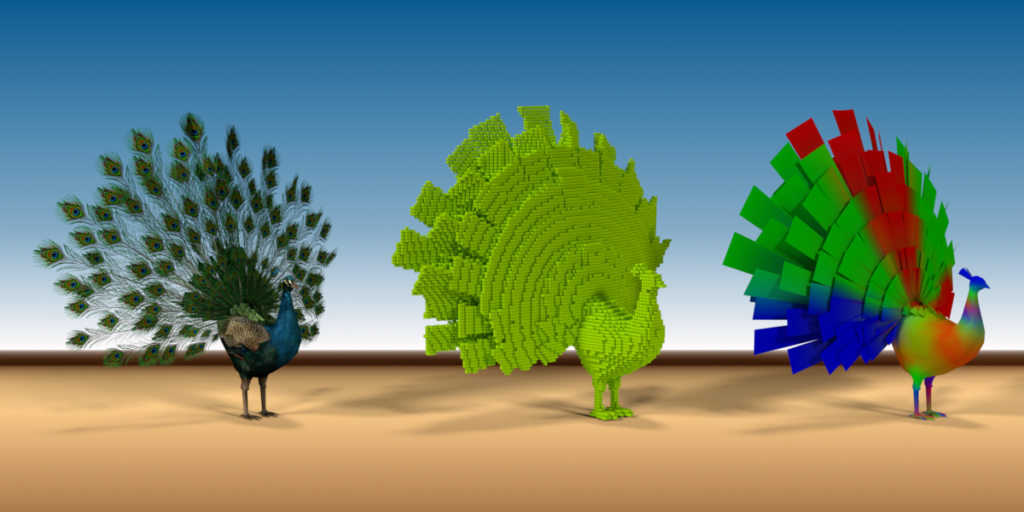
Traditional heat map diffuse skinning algorithm can only deal with watertight meshes, but artists create character components in their own way, then group them together to a character, usually the character is not seamless, this often cause traditional heat map diffuse skinning algorithm to fail.

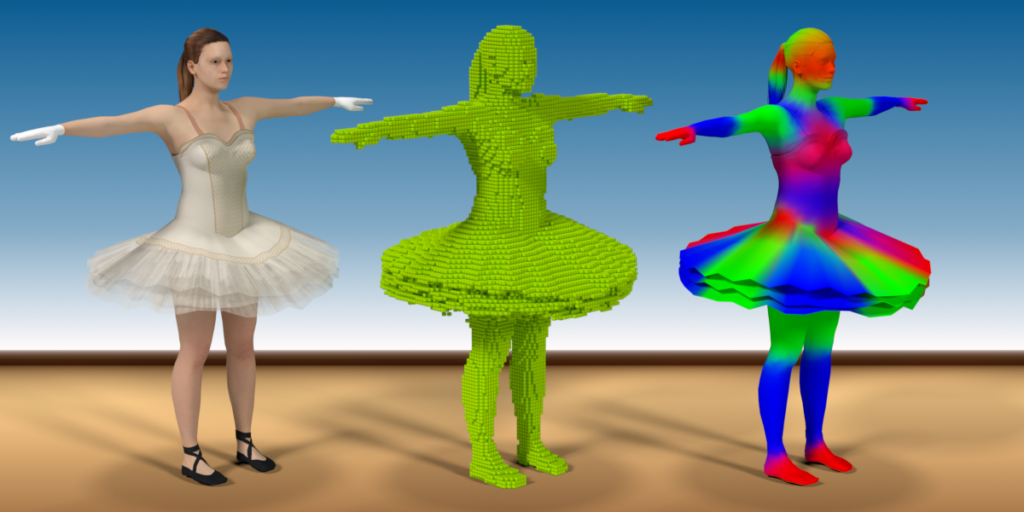
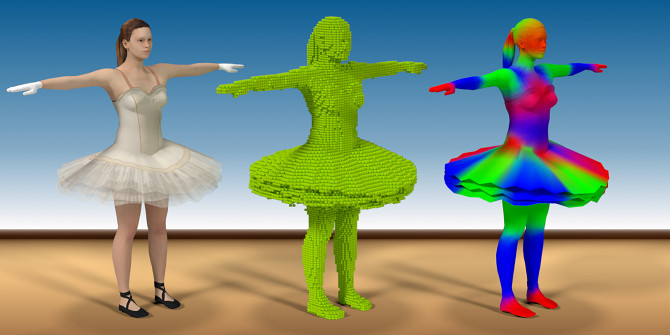
Voxel heat diffuse skinning algorithm can overcome the shortcoming, it converts the non-seamless character into a solid statue, heat diffuses in the solid statue, so we can get the most natural vertex weights.

The voxel heat diffuse skinning had already been equipped in Autodesk’s Maya and 3ds Max for years, but Blender users don’t have an opportunity to benefit from the feature.
Traditional heat map diffuse skinning algorithm can get much better result in detailed areas such as fingers and toes than voxel heat diffuse skinning algorithm, we can combine them to get perfect result with this Blender add-on.

We believe that all digital artists and game teams want this feature, fortunately, you can do perfect automatic vertex weight skinning within Blender today.
Interface
When selecting all the sub-meshes and the armature, the interface will appear in the animation tab of the tools shelf, one mouse click to finish voxel heat diffuse skinning.

Tutorial
Video Package: Download the HD version of the video(Format:zip,Size:119MB,Date:Oct 10,2017).
Watch Online:
Tutorial By CGDive:
Platform
Linux(x86_64/arm64)
Windows 7-11(x86_64/x86/arm64)
macOS 10.9-26.1(x86_64/arm64)
Note: The add-on supports both 64 bit and 32 bit of Windows.
CPU
The algorithm uses multiply CPU cores to boost the running speed, more CPU cores, more faster it runs.
Memory
The algorithm needs large memory to run high voxel resolution, the computer’s memory is at least 8GB
How To Install
Download the new version of the product.
Launch Blender, navigate to ‘Edit->User Preference…->Get Extensions’, click the small triangle besides the ‘Repositories’ dropbox to expand the contents, click the ‘Install from Disk…’ button, a pop up dialog will appear, select the downloaded zip file, click the ‘Install from Disk’ button on the pop up dialog, the extension will be installed to Blender’s ‘extensions->user_default’ directory.

Legacy way to install:
Launch Blender, navigate to ‘Edit->User Preference…->Add-ons’, click the ‘Install Add-on from file…’ button, a pop up dialog will appear, select the downloaded zip file, click the ‘Install Add-on from file’ button on the pop up dialog, the add-on will be installed to Blender’s addons directory.

When the pop up dialog closed, we are still on Addons page, a few seconds later, the add-on will appear, activate the add-on, then click the ‘Save User Settings’ button and close the ‘Blender User Preference’ window.
Note: Please don’t simply copy and paste the unzipped add-on directory to Blender’s own working add-on directory, because the operating system may prevent the add-on from writing temporary data to the directory, which will cause the add-on don’t work at all.
How To Upgrade
Download the new version of the product.
Before installing the new version, you must uninstall the current version.
Launch Blender, navigate to ‘Edit->User Preference…->Get Extensions’, click the small triangle besides this extension to expand the contents, click the ‘Uninstall’ button to remove the current version of this extension.

Legacy way to uninstall:

Launch Blender, navigate to ‘Edit->User Preference…->Add-ons’, type ‘voxel’ in the search box, the add-on will appear, click the small triangle besides the add-on to expand the contents, click the ‘Remove’ button to remove the current version of this add-on.
After having uninstalled the current version, install the new version of the product.
Don’t forget to restart Blender to let the new version take effect, otherwise, Blender may use the old version in the cache.
Blender 2.8+ Support
The latest version supports Blender 2.8+.
Please re-download your product and extract the package, there are two sub-directories named by Blender version, you may choose the corresponding version to install.
Type ‘n’ key in the 3d view if the sidebar is hidden. If you select both the meshes and the armature, the user interface will appear in ‘View3D->UI->Mesh Online’ tab of the sidebar.

Personal Workflow
Select all the sub-meshes and one armature, the interface will appear on the tool shelf section of ‘View3D->Tools->Animation’.
Because the alogrithm will convert all the sub-meshes to one solid statue to obtain best result, you’d better select all the sub-meshes and one armature before you run voxel heat diffuse skinning.
If you are rigging for RPG games, the armature is usually not complicated, you can use the default parameters, select all the sub-meshes and the armature, click the ‘Voxel Heat Diffuse Skinning’ button, the result will be fairly good.
Here are the steps:
1. Select all the sub-meshes and the armature, click the ‘Voxel Heat Diffuse Skinning’ button.
If you are rigging for a movie, the armature is usually rather complicated, in this case, we combine traditional heat map diffuse skinning and voxel heat diffuse skinning to get perfect result:
Here are the steps:
1. Select all the sub-meshes and the armature, type ‘Control’ key + ‘P’ key, from the pop up menu, click Armature Deform->With Automatic Weight.

2. Select the sub-mesh which vertices need to be protected, type ‘Tab’ key to enter ‘Edit’ mode, type ‘Z’ key to enter wireframe display mode, type ‘A’ key twice to select nothing, use either box select tool or circle select tool to select character’s hands parts and feet parts(if the character does not wear shoes), or other very detailed areas, type ‘Z’ key to back to solid mode, type ‘Tab’ key to back to object mode.
3. In the addon’s interface, check the ‘Protect Selected Vertex Weight’ button, all the selected vertices’ weights will be merged to new weights which generated by voxel heat diffuse skinning.
4. Select all the sub-meshes and the armature, click the ‘Voxel Heat Diffuse Skinning’ button.
Team Workflow
If you have a powerful server, for example, the CPU has 32 cores or more, you can greatly boost the speed by distribute the voxel heat diffuse task to the server.
From the ‘Blender User Preference’ window, activate the other three addons, click the ‘Save User Settings’ button and close the ‘Blender User Preference’ window.
Here are the steps:
1. Select all the sub-meshes, click File->Export->Voxel Mesh (.txt), type a filename, click ‘Export Voxel Mesh’ button to export a voxel mesh file.
2. Select the armature, click File->Export->Voxel Bone (.txt), type a filename, click ‘Export Voxel Bone’ button to export a voxel bone file.
3. Copy the two files to the server, and copy the addon’s zip file to the server, unzip the addon file, there is a command line tool for each platform: Linux, Windows and Mac, you can find them in the sub-directory of ‘voxel_heat_diffuse_skinning’->’bin’, in fact, the actual task is done by the command line tool.
4. Open a terminal window, run the command line tool for your platform without parameters, it will report the usage.
5. Run the command line tool for your platform with parameters, the parameters are the same as in the add-on’s interface except that you need to tell it where the voxel mesh file is, where the voxel bone file is, and where the voxel weight file is.
6. After the command line tool finished runing, copy the generated voxel weight file to the desktop computer. From Blender’s 3D View, select all the sub-meshes and the armature, click File->Import->Voxel Weight (.txt), select the voxel weight file, there is a ‘Protect Selected Vertex Weight’ button in the left panel, check the button if you want to protect some vertices’ weights, click ‘Import Voxel Weight’ button to import the voxel weight file.
Auto-Rig Pro Workflow
This add-on is compatible with Auto-Rig Pro, if you own Auto-Rig Pro, you can first bind all the sub-meshes to the armature with the “Bind” button of Auto-Rig Pro, then use this addon on top.
Here is the document: http://lucky3d.fr/auto-rig-pro/doc/auto_rig.html#skinning-binding.
I have recorded a short video to show how simple the workfow is, but it is just a basic binding, for more advanced binding, please refer to the above document.
Video Package: Download the HD version of the video(Format:zip,Size:14MB,Date:Mar 26,2022).
Watch Online:
Built-In Joint Alignment Tool Add-on
Since v3.5.0 the product package introduced a new built-in joint alignment tool add-on, I believe that the joint alignment tool will greatly facilitate your character binding workflow.
When we are binding the 3d character to the armature, to align the bones to the 3d character is a time-consuming task, for facial bones and finger bones are so small and there are so many such bones that it is hard to align them to corresponding mesh parts exactly in a short time.
Can we just move joints on a 2d plane? For moving joints to their proper 2d positions on the current 2d view plane is much easier than in 3d space. After we have finished aligning joints on current 2d view plane, if there is a magic tool that we can use to push all the joints to desired mesh surface or to desired mesh volume center in 3d space automatically, it will save us lots of time.
This joint alignment tool is exactly designed for this job, you just need to move joints to their proper positions on the current 2d view plane, then you can push selected joints to desired mesh surface or to desired mesh volume center with one click.
How to use the tool?
- Select the armature, enter ‘EDIT’ mode.
- Rotate the viewport to proper angle, switch to orthogonal view.
- Move the joints to their proper positions on the current 2d view plane.
- Select the joints, click the button to push them to mesh surface or mesh volume center.
Note:
- In surface mode, the tool always pushes the joints to the front surface of the mesh part, even if the joints are behind the front surface.
- In volume mode, the tool always pushes the joints to the volume center of the mesh part, the tool will cast a ray from every selected joint to the mesh part, and it uses the entering point and the leaving point to calculate the volume center, you might need to adjust the ‘Max Raycast Hit Count’ parameter, the default value is 2, which is suitable for manifold mesh part, you can imagine that a ray enters the mesh part then leaves the mesh part with only two hit points; if the mesh part is not manifold, you can imagine that a ray enters the mesh part then leaves the mesh part with more than two hit points, in this case, you need to increase this number to a proper value (such as 4) to let the ray can enter and leave the mesh part, but can’t enter other mesh parts, if there are other mesh parts in front of the ray, an inappropriate number might cause interference from other mesh parts, the result might be wrong.

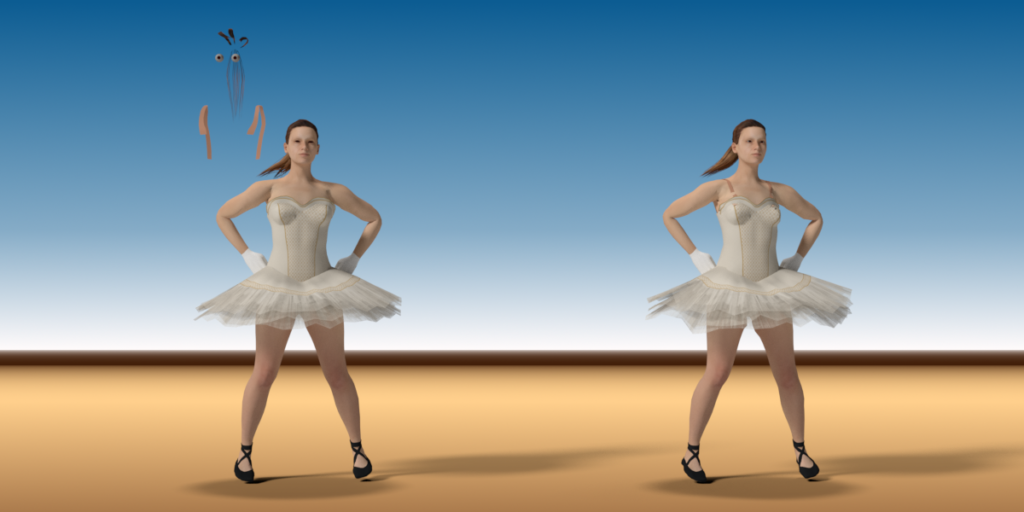
First, we align the facial joints on the current 2d view plane, then we push them to the head surface with one click automatically.

First, we align the ear joints on the current 2d view plane, then we push them to the head surface with one click automatically.

First, we align the forearm joints and the finger joints on the current 2d view plane, then we push them to the volume center of the forearm and the volume centers of the fingers with one click automatically.
Built-In Surface Heat Diffuse Skinning Add-on
Blender already has built-in bone heat weighting, it works well in most time, but sometimes it fails to find a solution.
To completely resolve the issue, I created an open source add-on on GitHub:
The surface heat diffuse skinning add-on can generate similar results to Blender’s built-in Armature Deform->With Automatic Weight tool, but it never fails.
You can use this free add-on to generate vertex weights for detailed areas when Blender’s built-in weight tool fails.
I have added this free add-on into the product, you don’t need to download it separately.
The installation and usage are very similar to the voxel heat diffuse skinning add-on.
Select all the sub-meshes and the armature, the interface will appear on the tool shelf section of ‘View3D->Tools->Animation’.
Simply click the ‘Surface Heat Diffuse Skinning’ button with default parameters to skin the meshes usually gives you a fairly good result.
Built-In Corrective Smooth Baker Add-on
I have integrated my Corrective Smooth Baker add-on into this add-on, you can use the add-on to fix vertex weight issues automatically, details refer to the product page.
Integrate To Your Own Workflow
There are two global properties since version 3.2.2:
- bpy.context.scene.surface_job_finished.
- bpy.context.scene.voxel_job_finished.
With these properties, you can integrate the skinning job to your own workflow.
First, call ‘bpy.ops.wm.surface_heat_diffuse()’ or ‘bpy.ops.wm.voxel_heat_diffuse()’ from script.
Then, check the property repeatedly until the value of the property becomes ‘True’.
Finally, do your custom jobs.
How Does The Algorithm Work?
The algorithm use ray tracing technology to convert polygon mesh to solid statue, which is quite different from Maya’s method, ray tracing always generate better result than multi-view voxelization methods.
Bones generate heats, heats diffuse among the solid statue, and lose a bit heat when diffused to neibour voxels, if we iterate the process, it will reach a balance status.
We use CPU’s multiple cores to boost the speed. For example, the CPU of my Mac mini (Late 2012) is 2.5G HZ Intel core i5, it has two cores, but each core supports two super threads, the algorithm will use four threads to generate solid statue and diffuse heats simultaneously.
When heat diffusing process completed, bones heats will distribute smoothly among entire solid statue, the heats values represent the influence weights of the bones.
Though the theory is simple, a good product needs to deal with lots of details.
Our goal is to generate better result and provide better skinning solution for Blender users.
Detail Of The Parameters

Voxel Resolution: The maximum voxel size, default value is 128, which is suitable for most characters, you may increase this value to use high resolution voxelization, usually this is not necessory.
Diffuse Loops: Heat diffuse pass equal to ‘Diffuse Loops’ multiply ‘Voxel Resolution’, default value is 5, which is enough for all cases, you don’t need to change this value.
Sample Rays: Use how many random rays to detect darkness, default value is 64, more sample rays, more accurate the solid statue, but runs more slower.
Influence Bones: How many bones will influence a vertex, default value is 8, which is suitable for desktop animations in Blender.
Note: You’d better use a smaller value such as 4 to run animations smoothly for mobile devices.
Diffuse Falloff: How much heat will lose when diffusing, default value is 0.2, which is suitable for most cases, more bigger the value is, more sharper the weight change will be.
Protect Selected Vertex Weight: If you want to preserve existed vertex weights for some vertices, select these vertices in ‘EDIT’ mode, quit ‘EDIT’ mode and enable this option.
Detect Solidify: Detect solidified clothes, if you enable this option, make sure that all bones are in the charecter’s volume, otherwise, the result may be wrong.
Use Selected Bones: Use only selected bones, if you enable this option, unselected bones will be ignored.
Use Half CPU Cores: Use only half of the CPU cores, if your computer get stuck, please enable this option to keep your computer running smoothly.
License
The add-on is under a dual-license.
The Python code of this add-on is under the GPL license.
The add-on interacts with a universal text format.
The product package also includes a command-line utility, which interacts with the universal format.
The command-line utility is written in c++, which links to c++ libraries to generate the binary file.
The add-on uses the command-line utility via a simple system call.
Supercharge your 3D creation workflow with premium selection of Blender Add-ons. Whether you are modeling intricate characters, sculpting realistic environments, or animating cinematic sequences, the right add-on can transform how you work inside Blender. Our curated collection includes powerful tools for UV unwrapping, procedural texture generation, rigging automation, rendering optimization, and more—each rigorously tested for compatibility with the latest Blender versions. Eliminate tedious manual processes and unlock advanced functionality that lets you focus on what matters most: bringing your creative vision to life. Explore our full range of professional Blender plugins today and take your 3D projects to the next level.
➡️ ➡️ For more Blender Plugins 😀 😀
Reviews
There are no reviews yet.