Neat Video Pro v5.3.0 After Effects, Adios, Premiere and Da Vinci plugin to eliminate noise and increase video quality in Adios, Premiere and After Effects software is one of the best and most powerful.
- Reduce and eliminate professional noise from the movie
- Eliminate digital noise generated by camera sensors and camcorders
- Remove thaws created on analog or digital movies
- Dust removal in digitized movies
- Changes in light and contrast of videos
- Film transparency
- Start the installer:
For Windows:
Double-click the downloaded EXE file to start the installer
For Mac OS X:
a. Double-click the downloaded DMG file to mount the volume
b. In the mounted volume, double-click NeatVideoAE.Intel.pkg to start the installer
(you may be prompted to enter the Name / Password of the OSX administrator account)
- Proceed through the steps of the installation process. Use the default settings offered by the installer. If the installer does not automatically find the location of the host application (in the “Additional tasks” step of the installation), please specify the right location manually and then complete the installation process.
- Start After Effects and find Neat VIdeo > Reduce Noise v4 in the After Effects’ Effect menu.
2. Running Neat Video on a sample video clip
Please download the test-kit prepared to help you start using Neat Video. Having downloaded, please unzip it to a new folder on the hard disk.
The test-kit includes a sample video clip: SampleClip.mpg. This is a typical video clip captured by a digital video camera in high-gain mode. Some technical information about the sample clip is available in the SampleClipInfo.txt file.
Please start After Effects and go through the steps below to clean the clip using Neat Video.
2.1. Add the sample clip to the project
1. Create a new composition in the default empty project
Use the Composition > New Composition… menu item in After Effects:

Click OK. The timeline and composition preview windows will open after that.

2. Add the sample clip file to the project
Use the File > Import > File… menu in After Effects to import the SampleClip.mpg file into the project:

3. Add the sample clip to the composition
Select the sample clip in the Projeсt window and drag-n-drop the clip into the composition:

The After Effects preview window will display the sample clip and you will see that there is strong noise in it. The task of Neat Video is to reduce this noise.
2.2. Add Neat Video to the composition
- Select the layer with the sample clip in the Timeline window:

- Make sure After Effects’ preview is set to work in full resolution: select Full in the Resolution / Down Sample Factor popup under preview in After Effects:

- Disable Fast Previews using the corresponding control under preview in After Effects: set that control to the Off (Final Quality) mode:

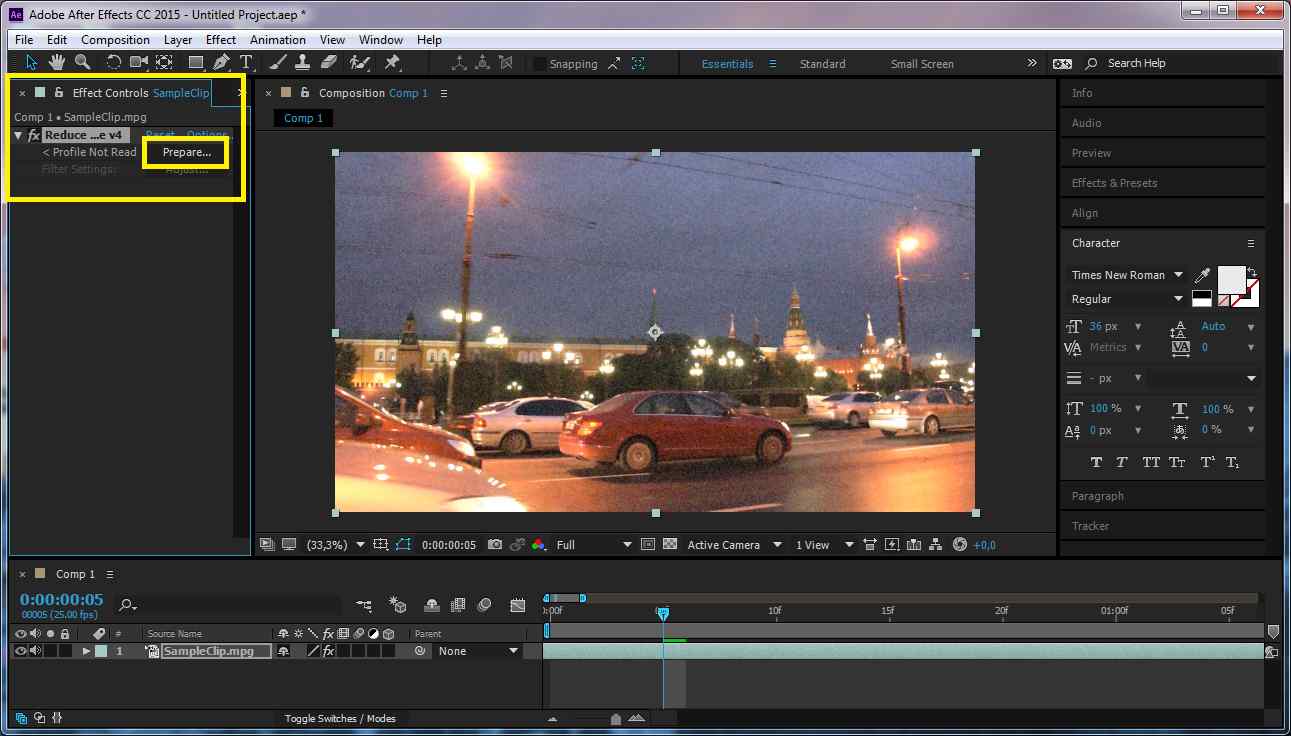
- Use the Effect > Neat Video > Reduce Noise v4 menu item to add Neat Video to the layer. This will add the Reduce Noise v4 to effects in the Timeline and Effect Controls windows:

2.3. Configure Neat Video
1. Open Neat Video plug-in window
- In the composition in the Timeline window, use the Current Time Indicator to select a frame with large flat featureless areas; the selected frame will be used for noise analysis in the next stages.
- Click the effect’s Options… link (to the right of the Reduce Noise v4 effect name) in AE’s Effect Controls window, or click the Prepare… button (available in latest versions of After Effects).
(If you run the Demo plug-in, click Ok in the popup splash screen of the plug-in to proceed further).

The Neat Video plug-in window will open and display the current frame from the clip:

2. Build a noise profile for the clip
To reduce noise in this frame and in the whole clip, Neat Video generally needs a noise profile describing the noise properties of the clip. You can prepare such a profile using the Auto Profile function:
- In the Device Noise Profile tab
 click
click 
Neat Video will then automatically analyze the noise to build a new noise profile:

- Visually inspect the selected area — it should contain no visible details, only noise; otherwise the noise profile and subsequent noise reduction may be inaccurate.
If the selected area does contain any details, move the selection to a featureless area or simply draw a new selection in such an area (the selection must be at least 32×32 pixels large). Then click the Auto Profile button again.
- After that Neat Video is ready to filter the sample clip.
3. Check Preview
- Switch to the Noise Filter Settings tab

You will notice that Neat Video has already applied noise reduction based on the default filter settings and the preview shows a clearly visible difference: there is less noise than in the original frame.
You can try to adjust the filter settings and see how that affects the results. For example, try to adjust the Temporal Filter > Radius setting (in the Temporal tab in the Filter Settings box in the right part of the window) from 2 to 1 or to a higher value. This will apply weaker or stronger temporal noise reduction to the frame.

4. Apply the changes
- Click
 in the bottom of the plug-in window.
Neat Video will save the current settings and close its main window.
(If you run the Demo plug-in, it will also describe the limitations of the Demo version at this point).
Once this step is completed and Neat Video window is closed, the filter is ready for work.
The preview in After Effects now shows the clip with noise reduction applied to it:

2.4. Render the video
To apply Neat Video noise reduction
- Use the tools available in After Effects to render the clip and play back the results.
For example, use the menu command Composition > Preview > Play Current Preview to render the clip and play it back (playback may be slow during rendering, it should play at full speed once rendering is completed).
After Effects will then apply Neat Video noise reduction to the whole sample clip to help you evaluate the filtration results (and adjust the filter settings if necessary). You will see that the noise in the resulting clip is significantly reduced while the true details are preserved.
3D Plugins are a way to extend the functionality of your video editing software. They can be used for anything from color correction to 3D animation and compositing…
3D Plugins are a set of utilities for after effects, premiere, cinema 4D.., created specifically for the professional needs of video Editors artists.
➡️ ➡️ For more 3D Pluggins 😀 😀
System Requirement For adobe after effects


Reviews
There are no reviews yet.